Quantcast
Channel: UOBDII Official Blog
Viewing all 3191 articles
Browse latest View live

Esys coding made easy: Step-by-step instructions for Fxx Series

$
0
0

Coding made easy: Step by step instructions for Fxx Series

Coding is for people who want to play with the settings of BMW car software to achieve something more desirable. Coding is not really a programming; it is another name for re-configuring the software of your car. There are limited risks of messing up with your car SW but if you are careful, follow step by step instructions and know and understand what you are doing, it may be OK to go ahead. Never try to guess and do it, be absolutely sure for your steps, clarify your doubts before you proceed. There are experts on the forum who are willing to help you, don’t hesitate to ask even a silliest question. Never-the-less, if you want to try new unknown settings which others have not tried, believe me, you are playing with fire.

READ THE INSTRUCTIONS VERY CAREFULLY.

What is needed for coding:

  1. ENET cable
  2. E-Sys software 3.26.1 with EST token and Pin
  3. psdzdata 54.2
  4. A dedicated laptop with Windows 7 with minimum 16 GB of free space
  5. Backup utility for CAF files (optional), file attached
  6. Useful Cheat Sheet for Fxx, file for F25 attached, others are available in different forums

Prepare your setup:

You can build your own cable or buy from a good source. Use shielded cables only. Cable should be reliable as interruption and electrical noise interference of any kind during coding could be very risky.

Delete unwanted SW and data from your laptop. It may be worthwhile to de-fragment your HD of laptop before installing the coding software as this software will occupy almost 12 GB to 44 GB of space on HD. Use the power adapter to keep batteries charged all the time as installation will take several minutes depending upon the performance of the laptop and data storage media.

Always try to clarify your doubts on forum as it also helps other readers, but you are welcome to contact me directly for any help if that boosts your confidence.

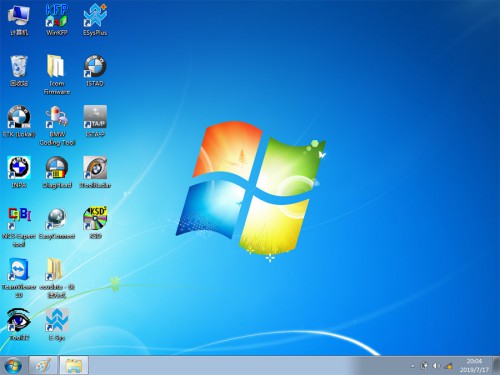
E-Sys Software installation:

Use the following procedure to install software on your laptop:

  1. Installation file for the E-Sys is an exe file whose name is like “E-Sys_Setup_3_24_3_RC_b38445.exe”
  2. Double click on this file and follow the instructions on the screen.
  3. Use default settings.
  4. Once the E-Sys is installed, it will create two folders on C: drive, namely Data and EC-Apps
  5. Copy your procured psdzdata folder and replace empty folder under “C:\Data\”
  6. It will create a desktop shortcut to start E-Sys

Setting up the EST token for E-Sys:

  1. Create a folder EST anywhere on C: drive. You can create under C:\Data and copy your token ( a *.est file)
  2. Launch E-Sys by double clicking its shortcut on desktop. It might take a minute to start, have patience.
  3. Select Options > Settings. Select EST tab.
  4. Click on the browse button with three dots ( … ) and navigate to EST folder C:\Data\EST
  5. Select file “******.est” and click OK to save the location and close the “Settings” window.

(If you have procured your token from an external source, follow additional supplied directions to complete token installation)

Preparation for coding:

  1. It’s a good practice, though not a must, to shut off any wireless or Bluetooth service on the laptop. Let just laptop and car talk to each other with no external interference.
  2. As a precaution, disable any firewall on the laptop. I don’t like even any anti-virus software as their behavior is not well known, and may interfere with the communication. It’s advisable to disable them.
  3. It is preferred to start with fully charged batteries of laptop and car as no interruption can be tolerated during transfer of data from laptop to Car. For long coding session, a car battery charger may be needed.
  4. Car audio and video drain off the battery fast, so better switch them off during coding.

Connect E-Sys to your Car:

  1. Connect ENET cablebetween car’s OBD port and network port of laptop.
  2. Switch on the ignition of the car, don’t start the engine.
  3. You will notice laptop tries to connect to the car. Wait a few minutes until the network icon on laptop shows a Connection with the yellow exclamation point over it. If you don’t see the network icon due to your laptop settings, wait for a minute.
  4. Start your E-Sys on your laptop.
  5. Press connect button on top row of E-Sys to connect car with the laptop.
  6. It opens up a dialog box.
  7. Select the correct TargetSelector for your model of the car, e.g. F025 and not F025_DIRECT for X3 model.
  8. Select “Connection via VIN” and press Connect.
  9. Wait for the Connection message. Click OK. If the connection was established successfully you see the selected target in the status bar at the bottom.

Full backup of Car’s configuration files:

It’s a good practice to take a full back up of Car’s original settings before any changes are made to the car. These files could be used as reference in case it is desired to go back to original settings of any or all features.

Read and Save FA:

  1. Connect E-Sys to your car.
  2. Select “Expert Mode” on the left pane and click on “Coding” button therein. It will display 4 sections/Boxes on the right side.
  3. In Vehicle Order Box (upper left), click on “Read” button, it would display FA of your car under FA List.
  4. Select FA and click on “Save” button. Save as FA_original.
  5. Test button above will show the path of the saved FA file.

Read and Save SVT:

  1. Look at SVT Actual Box (right pane, midway down) and click on “Read SVT” button.
  2. SVT box on left will display SVT of different modules of your car.
  3. Click on the Save button on SVT Actual box and name the saved file as SVT_original.
  4. Text button above will display the path of the saved file.

Read and Save CAFD (ncd) files:

  1. Inside SVT box (left side), you see SVT, containing ECUs and each ECU contains files in expanded view.
  2. Notice that some of the CFD files will have green check marks. These green marked CAFD files are of our interest.
  3. Right click on first green marked CAFD and then press and hold control key on your laptop and click on all other similar marked CAFD files. This way all such CAFD files will be selected for further operation.
  4. Now move to right in “Coding” box and click on “Read Coding data”. After codes are read, green icon will change into a folder icon and the files inside will contain the data read from your car.
  5. Check the folder “C:\Data\CAF”, this will contain all the read CAFD files.
  6. Copy and Save all the files in a safe place. These are your original CAFD files.
  7. Alternatively, you can use utility “Copy_CAF_v3.bat”, copy it anywhere on your laptop and double click on it to automatically save the files under a Folder “C:\My_CAF_Files” with date and time stamp.

Reading current Integration Step (I-Step) of your car:

It’s good to know the current I-Step of your car as that decides the minimum version of psdzdata that can be used to code your car.

  1. Connect E-Sys to car following the steps given above.
  2. Select expert mode on the left pane and click on VCM button.
  3. On the right bottom box, select “Master” tab.
  4. In I-Steps box, click on “Read” button.
  5. Integration Steps boxes above will be populated with the data. Note down the I-Step (current).
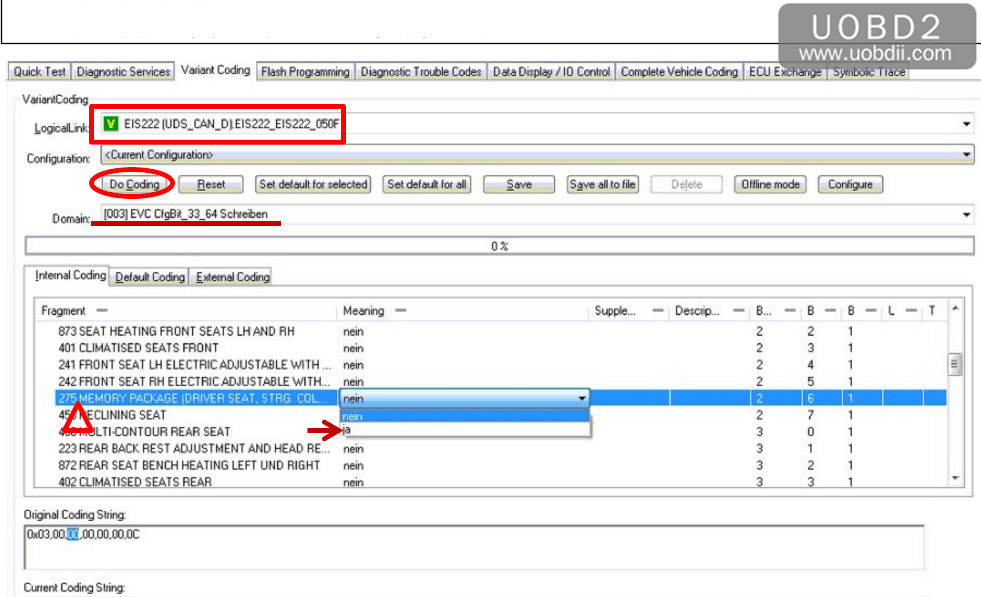
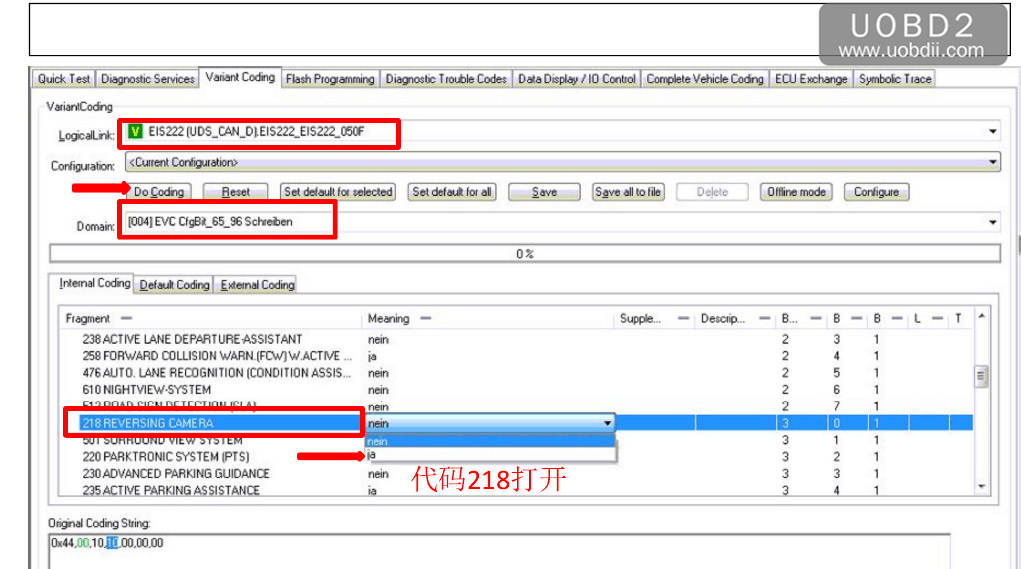
Coding CAFD files:

CAFD files (ncd) contain the setting data/ parameters for each ECU. Modifying the values in these files change the behavior of ECUs.

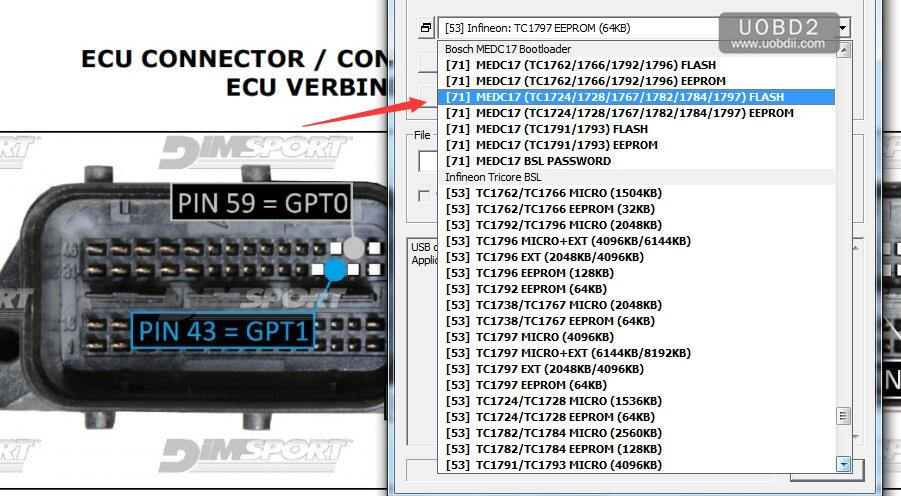
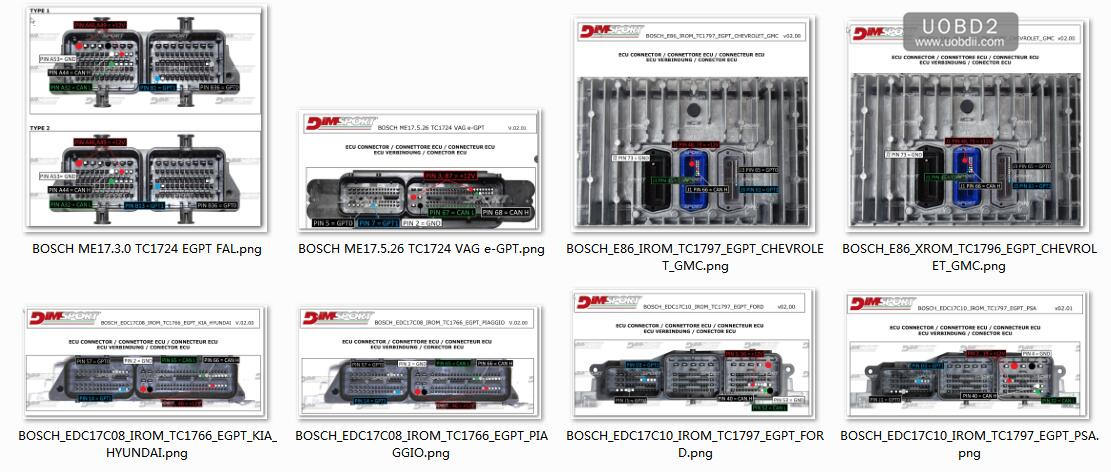
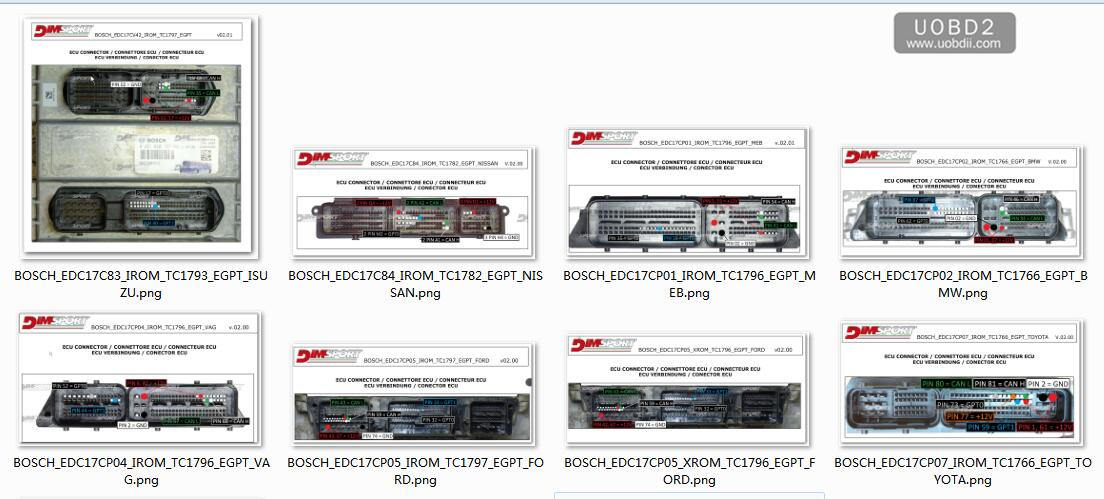
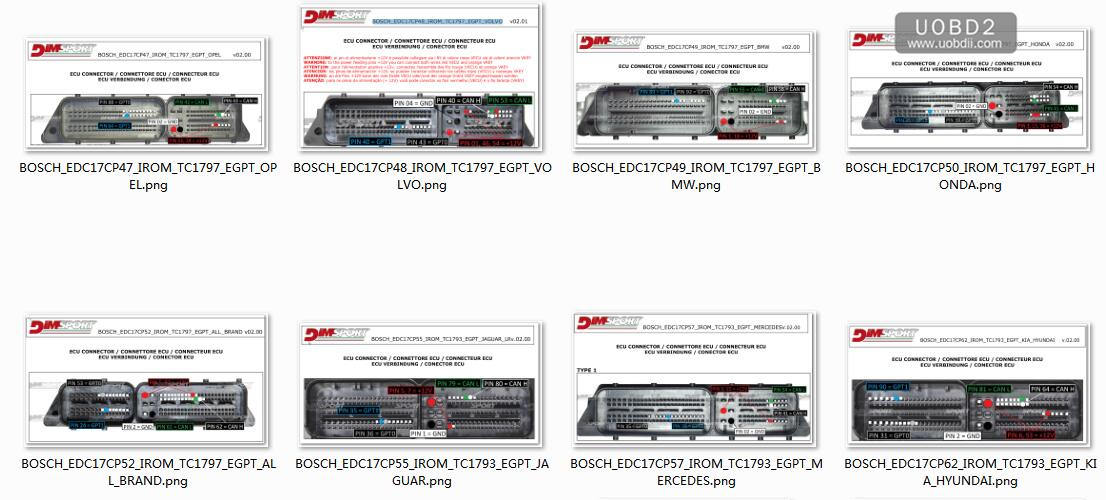
  1. Connect E-Sys to car and follow the steps to read CAFD file/s to be coded. (You may take help of cheat files to decide which ECU you would like to code and which are the associated CAFD files).
  2. Expand the folder of the selected CAFD file. Right click on the CAFD file and click “Edit FDL”. Enter the pin if asked.
  3. Open the module you wanted to edit under “Daten”, click on the Functionen folder, then open the ausgelessen folder of the selected function. It will show the current settings.
  4. Change them as per Cheat Sheet and Save.
  5. To be on the safer side, edit only one ECU at a time.
  6. After making all changes in the CAFD files of ECU as per the cheat sheet for that function, save and go back by pressing top extreme left green arrow “back” button.
  7. Now you can see FA again. Right click on it and “Activate FA”. You will see a green active text next to FA. Also FP will open on the right side.
  8. Select the edited CAFD file on SVT box and Click on “Code FDL” in coding box on right.
  9. Coding process will start and should end with no errors.
  10. Take a backup of all the CAFD files again and save in a different folder. Best way is to use “Copy_CAF_v3.bat”. Copy it anywhere on your laptop and just double click on it, all will be done for you and files will be saved under a new date time stamped folder.
  11. Great, you coded one module. Disconnect E-Sys by clicking on top Connect button which is showing a red x. You are done.
  12. Test the car for the changed feature. Some features require 15 -30 minutes to get activated where as some are instant and few need you to switch off the and lock the car and unlock and start.

Lonsdor K518S Add New Key for Honda CR-V 2015

$
0
0

Here UOBD2 share you the test report on Lonsdor K518S program new key for Honda CR-V 2015.In this case it is a adding key testing,you need to working key.

Lonsdor K518S Add New Key for Honda CR-V 2015 (1)


Procedures:

Connect Lonsdor K518S to Honda CR-V obd port,then enter menu to select “Immobilization”

Lonsdor K518S Add New Key for Honda CR-V 2015 (2)

Select “Honda”

Lonsdor K518S Add New Key for Honda CR-V 2015 (3)

Select from vehicle

Lonsdor K518S Add New Key for Honda CR-V 2015 (4)

Select “CR-V”

Lonsdor K518S Add New Key for Honda CR-V 2015 (5)

Select “2012-”

Lonsdor K518S Add New Key for Honda CR-V 2015 (6)

Immobilizer

Lonsdor K518S Add New Key for Honda CR-V 2015 (7)

Now we need to check which IMMO type can do this vehicle model,select “Search IMMO type”

Lonsdor K518S Add New Key for Honda CR-V 2015 (8)

Immo type

Lonsdor K518S Add New Key for Honda CR-V 2015 (9)

Now switch ignition ON

Lonsdor K518S Add New Key for Honda CR-V 2015 (10)

Here Lonsdor K518 show you need to use “immobilizer system 2”

Lonsdor K518S Add New Key for Honda CR-V 2015 (11)

Back menu to select “IMMO2”

Lonsdor K518S Add New Key for Honda CR-V 2015 (12)

Add one key

Lonsdor K518S Add New Key for Honda CR-V 2015 (13)

And insert registered key and switch ignition

Lonsdor K518S Add New Key for Honda CR-V 2015 (14)

Switch ignition off in 15 seconds

Lonsdor K518S Add New Key for Honda CR-V 2015 (15)

Use an original key within 17 seconds to switch ignition on

Lonsdor K518S Add New Key for Honda CR-V 2015 (16)

Switch ignition off in 17 seconds

Lonsdor K518S Add New Key for Honda CR-V 2015 (17)

Switch ignition on with a new key in 20 seconds

Lonsdor K518S Add New Key for Honda CR-V 2015 (18)

Switch ignition off in 17 seconds

Lonsdor K518S Add New Key for Honda CR-V 2015 (19)

Switch ignition on within 20 seconds without replace key

Lonsdor K518S Add New Key for Honda CR-V 2015 (20)

Switch ignition off in 15 seconds

Lonsdor K518S Add New Key for Honda CR-V 2015 (21)

Switch ignition on

Lonsdor K518S Add New Key for Honda CR-V 2015 (22)

It will prompt you “Is immobiliser light off?”Press “OK” to continue

Lonsdor K518S Add New Key for Honda CR-V 2015 (23)

Switch ignition off in 15 seconds

Lonsdor K518S Add New Key for Honda CR-V 2015 (24)

Switch ignition on

Lonsdor K518S Add New Key for Honda CR-V 2015 (25)

Now key programming successfully

Keys programmed:3

Check all keys to ensure each can start car engine

Lonsdor K518S Add New Key for Honda CR-V 2015 (26)

Programming complete

Lonsdor K518S Add New Key for Honda CR-V 2015 (27)

Done!

Source:

http://www.uobdii.com/wholesale/lonsdor-k518s-key-programmer-full-version.htmlhttp://www.uobdii.com/wholesale/lonsdor-k518s-key-programmer-full-version.html

Discussion:Toyota TIS Techstream OBD2 interface

$
0
0

General questions about OBD2 interfaces:

MVCI for Toyota, Honda, Volvo:

http://www.uobdii.com/wholesale/jlr-mangoose-volvo-vida-toyota-tis-3-in-1-scanner.html

Another, less expensive one:

MINI VCI for TOYOTA TIS Techstream V14:

http://www.uobdii.com/wholesale/cheapest-mini-vci-for-toyota.html

Mangoose:
http://www.uobdii.com/wholesale/mangoose-toyota-diagnostics-and-reprogramming-interface-1687.html

Search Results for Toyota TIS:
http://www.uobdii.com/search/?q=Toyota+TIS&DirID=

Are these more or less recent USB to OBD2 devices pretty much the same? There are many out there, but is it correct that if the device connects to the port and can read and write, then it is all a matter of software after that point? Are the devices tied to proprietary software, or is the OBD2 port generic enough that any software will work with any (recent) interface?

Answer:

If OBD was really a standard, there would be 4 pins on the connector. Instead there are 16 pins. There’s the old GM standard pins, the Ford pins, the European pins, the current Toyota pins, the Leaf pins…..

The connector that plugs into the OBD port has a microcomputer in it that translates some subset of the OBD possibilities into a serial protocol. That serial protocol can be delivered to a PC via USB or Bluetooth.

There are currently two major device standards in use, ELM and J2534. The cheap devices all use ELM, and most are imitations of the devices made by ELM Electronics.

ELM is ok for slow speed queries of the CAN bus on current Toyotas. There are a few premium ELM protocol devices that are fast enough to handle the full data rate on a Prius. The ELM protocol does not support the K-Line interface on the Prius, which means that TPMS, Gen2 keyfob, and Gen2 option setup cannot be supported by any software on the PC.

J2534 is required for use with Techstream. Which means the Denso interface that dealers use, the Mongoose, the Tactrix, or one of the Mongoose imitations like the Mangoose (I kid you not…). The Tactrix has really only been debugged with Subaru/Mitsubishi vehicles. I don’t have any experience with the Mongoose clones.

Note: the MVCI only are compatible with Windows XP, so you’ll want to confirm first. I purchased a Netbook to use with them, as it is smaller than my laptop and easier to maneuver in a car.

Autel AP200 Perform Injector Adjustment for BMW Z4

$
0
0

After replace injectors,replacing ECU or DME or swapping the engine,you need to adjust injectors.So here UOBD2 will show you guide on how to use Autel AP200 to adjust injector for BMW Z4.


Procedures:

Connect Autel AP200 to BMW Z4 obd port

Autel AP200 Perform Injector Adjustment for BMW Z4 (1)

Build connection between your mobile phone and Autel AP200 diagnostic tool by bluetooth

Then click “Service”

Autel AP200 Perform Injector Adjustment for BMW Z4 (2)

Select “Injector” function–>”BMW”

Autel AP200 Perform Injector Adjustment for BMW Z4 (3) Autel AP200 Perform Injector Adjustment for BMW Z4 (4)


Select “Automatic selection”

Autel AP200 Perform Injector Adjustment for BMW Z4 (5)

Wait for vehicle identification

Autel AP200 Perform Injector Adjustment for BMW Z4 (6)

Select “Hot Function”

Autel AP200 Perform Injector Adjustment for BMW Z4 (7)

Select “Determining the injectors”

Autel AP200 Perform Injector Adjustment for BMW Z4 (8)

This service function is used to determine which injectors are to be installed.

Relevant engines are N20,N26,N55,S55,N63T…

Click “Continue”

Autel AP200 Perform Injector Adjustment for BMW Z4 (9)

It will show you the injectors required

Autel AP200 Perform Injector Adjustment for BMW Z4 (10)

The stored adjustment values are read in the next step.

Note:Depending on the version,either an injection quantity compensation is carried out or a low quantity adaptation is initiated with this service function.

The procedure is the same in both cases.

Autel AP200 Perform Injector Adjustment for BMW Z4 (11)

The stored values were read out:

Autel AP200 Perform Injector Adjustment for BMW Z4 (12)

Should the adjustment values from a replaced engine controller be adopted?

Click “Yes”

Autel AP200 Perform Injector Adjustment for BMW Z4 (13)

Now select F1:The adjustment values are read out from the injectors and entered

Autel AP200 Perform Injector Adjustment for BMW Z4 (14)

Select:F4 Enter new adjustment values

Autel AP200 Perform Injector Adjustment for BMW Z4 (15)

Input which cylinder (1-4) should a new value be entered

Autel AP200 Perform Injector Adjustment for BMW Z4 (16)

And enter new value for following cylinder:Cylinder 1

Autel AP200 Perform Injector Adjustment for BMW Z4 (17) Autel AP200 Perform Injector Adjustment for BMW Z4 (18)


Then repeat above procedures for cylinder 2-4

Autel AP200 Perform Injector Adjustment for BMW Z4 (19)

Click F2:Save adjustment value

Switch off terminal 15 and terminal R

Autel AP200 Perform Injector Adjustment for BMW Z4 (20)

Adjustment value currently stored in the engine control.

Autel AP200 Perform Injector Adjustment for BMW Z4 (21)

Switch on terminal 15,click “Continue” button

Autel AP200 Perform Injector Adjustment for BMW Z4 (22)

Now back to select F3:Read out adjustment values

Autel AP200 Perform Injector Adjustment for BMW Z4 (23)

It show you the value you adjust just now

Autel AP200 Perform Injector Adjustment for BMW Z4 (24)

Done!

http://www.uobdii.com/wholesale/autel-maxiap-ap200.html

BMW CAS3, CAS3+, CAS4, CAS4+, FEM / BDC make keys, what tool? any reviews?

$
0
0

Looking for recommendations for a BMW key programmer that has more success in  programming keys for BMW CAS3, CAS3+, CAS4, CAS4+, FEM / BDC? It depends on what year the BMW is, with EWS system for old model ak90 for new model with cas system vvdi2 , cgdi, Yanhua mini acdp, autohex , BMW Multi tool …………… and if you had a lost key situation you need a good programmer to read mcu and key maker to make new key
a lot of tools, remember one tool never enough.

Vote VVDI2 BMW software

BMW 535 GT CAS4 All Keys Lost Done by VVDI2 BMW V6.6.1 By OBD

BMW 520 F10 2016 CAS4 key programming by OBD with VVDI2 BMW V6.6.1works fine

Related images and procedure are list in this article:

http://blog.uobdii.com/how-to-safely-use-vvdi2-obd-program-cas4-cas4-key/

I’m using VVDI2 and VVDI prog to make all kind of BMWkeys.
So far it’s a great tool, been using it now for 3 months and really not had any problems with it.

Any more VVDI2 BMW reviews, you can google search and there will be lots videos, forum posts, articles.

Vote CG pro 

For CAS3, CAS3+, CAS4, and CAS4+ I really like CG pro. Do dump from BDM and make key, software is only like $300, NO token nonsense.
CGDI does keys for CAS1-CAS3+ via OBD, CAS4 and 4+ from dump, plus FEM/BDC. Unfortunately the ISN capabilities are greatly exaggerated. No tokens with either one, but ISN read for all-keys-lost probably only works for 3 or 4 types of DME.
I really suggest doing keys from dump rather than OBD with Chinese tools, much safer. The FEM stuff is a little sketchy too. I’m in the whatsapp tech group for the CG products, and people brick CAS and FEM kinda regularly.
Keys from dump is very safe though.
I hate to drop two grand on Autohex, but I’m likely headed in that direction for FEM/BDC.

AutohexII is trusted and secured tool for thin but not the cheapest one .

CG Pro can make keys from dump, and it’s only like $300. To my knowledge, that is the cheapest tool to make keys from dump. It can read ISN with key, which is also nice for backup purposes.

Vote Yanhua mini ACDP

1st user said:

I use Yanhua mini, PC version. Been successful in key duplicate CAS2,CAS3, CAS3+, Cas4 with working key available. No soldering, I love it.

Not tried CAS3++ and CAS4+ all keys lost. It reads DME ISN very well in most cases (see supported DMEs) where I have tried it but again, all keys lost is not tested for CAS crypto and cas4.

Used it to replace MSV80, MEV1722 DME’S successfully.

I have also agonised over autohex or BMWE but the cost of those does not make any economic sense for the part time work I do on keys and ecu replacement. Ill make do with the Chinese tools for now.

Oh, and the first Chinese tool I have used that has customer service that responds and tries to resolve issues

2nd user said:

I’ve had no issues with it so far and have done cas4, cas3, frm, key renew, retrieved ISN from MSD85.

I use on laptop not phone and have very happy with it so far, the PC connection is wireless, 2.4MHz, will not work on 5G. Took me forever to find that out. It is better as I don’t have to worry about transferring files back over to it from phone. You can always upload files to phone so you have them both devices.

Make sure you get any pins detected, I could understand if maybe 1 or 2 pins not detected but if not able to detect any that would point to bad unit. Be sure to use their cleaning tool for pin connections, I tried without doing when I first got it and noticed I would get no detection on certain pins. Also make sure switch on side of OBP+ICP is not in can mode. So far the hardest part of using this tool was the initial setup and authorizations, been flawless so far.

3rd user said:

Reading eprom cas4 and make a key for f11 so far done.
cas4 reading eprom compared with vvdi reading and its matching 100%

4th user said:

I have both ACDP AND CGDI, yes both are good on E and Fseries especially for keys.

View Yanhua mini ACDP BMW CAS FEM/BDC Coverage:

http://blog.uobdii.com/yanhua-mini-acdp-car-list-for-bmw-cas1-cas4-fem-bdc-bdc2/

Vote BMW Multi tool

I used the BMW Multi tool to make keys for my E series cars with CAS 2 and 3.

Actually, BMW Multi tool is old version and not available on the market.

Vote bmw explorer or autohex

Buy bmw explorer or autohex. Sometimes there will be discounts.

Conclusion:

There is a lot BMW key programmer incl. cheap ones and expensive ones, it depends on each user. some use only for key prog some other use for scan adapt and reprogram modules and key prog. autohex, bmw explorer, cgdi, acdp, vvdi2 bmw, ak90 for older models etc.


VVDI MB Tool All Keys Lost Programming for Benz W204 w207

$
0
0

In this instruction,UOBD2 want to show you how to use VVDI MB tool to program new keys for Mercedes Benz W204 W207 all key lost.


Run VVDI MB Software,and select “EIS Tool”

Chassis “Auto Detect (CAN)”

Click “Read EIS data”

Select “Save EIS data” to save the EIS data on your PC

VVDI MB Tool All Keys Lost Programming for Benz W204 w207 (2) VVDI MB Tool All Keys Lost Programming for Benz W204 w207 (3)


Select “Password Calculation”

VVDI MB Tool All Keys Lost Programming for Benz W204 w207 (4)

Select this if lost all working key

Then select “W172,W204,W207”

Select “Data Acquisition”

VVDI MB Tool All Keys Lost Programming for Benz W204 w207 (5)

Then it will prompt you with below massage

Warning:

1.This operation need about 2.5 hours.

2.Connect EIS with correct cable before contiue

3.Don’t connect ESL to cable

Click “Yes” to continue

VVDI MB Tool All Keys Lost Programming for Benz W204 w207 (6)

Connect EIS with correct cable on the bench,don’t connect ESL

Connect “device OBD line” to cable OBD head.

Attention:Not car OBD

Press OK after confirm

VVDI MB Tool All Keys Lost Programming for Benz W204 w207 (7)

Connect “IR adapter” to VVDI MB Tool

Please connect VVDI MB BGA Tool,EIS and emulator key as blow show

VVDI MB Tool All Keys Lost Programming for Benz W204 w207 (8)

Press OK,now it will cost you about 2.5 hours

After then completing,please save the data on your PC

VVDI MB Tool All Keys Lost Programming for Benz W204 w207 (9)

Acquistion finished,upload the saved data with “Upload Data” for password,click “OK” to continue

VVDI MB Tool All Keys Lost Programming for Benz W204 w207 (11) VVDI MB Tool All Keys Lost Programming for Benz W204 w207 (12)


Select the data you save just now

VVDI MB Tool All Keys Lost Programming for Benz W204 w207 (13)

Upload success.Queue number:1,require about 1 minutes to finish

VVDI MB Tool All Keys Lost Programming for Benz W204 w207 (14)

Wait about 1 minute,the press “Query result”

VVDI MB Tool All Keys Lost Programming for Benz W204 w207 (15)

Copy “Key Password”

VVDI MB Tool All Keys Lost Programming for Benz W204 w207 (16)

Back to “EIS Tool” and click “Read EIS data”

Paste the key password

VVDI MB Tool All Keys Lost Programming for Benz W204 w207 (17)

Save EIS data

VVDI MB Tool All Keys Lost Programming for Benz W204 w207 (18)

VVDI MB Tool All Keys Lost Programming for Benz W204 w207 (19)

Press “OK” to save HC05 formal file

VVDI MB Tool All Keys Lost Programming for Benz W204 w207 (20)

Select “Prepare Key File” and click Load EIS file

VVDI MB Tool All Keys Lost Programming for Benz W204 w207 (21)

Select the data file you save just to upload

VVDI MB Tool All Keys Lost Programming for Benz W204 w207 (22)

Select “Key 4” and “v051”,then click “Prepare Key file”

VVDI MB Tool All Keys Lost Programming for Benz W204 w207 (23)

Now save the key file

VVDI MB Tool All Keys Lost Programming for Benz W204 w207 (24)

VVDI MB Tool All Keys Lost Programming for Benz W204 w207 (25)


Then click “Load Key file” to load key file you save

VVDI MB Tool All Keys Lost Programming for Benz W204 w207 (26) VVDI MB Tool All Keys Lost Programming for Benz W204 w207 (27)


Click “Write” button to start writing key

VVDI MB Tool All Keys Lost Programming for Benz W204 w207 (28)

Now click “Identification key” again to check

VVDI MB Tool All Keys Lost Programming for Benz W204 w207 (29)

The key data file have been wrote into key,then back to “EIS Tool”

VVDI MB Tool All Keys Lost Programming for Benz W204 w207 (30)

Click “Read EIS data”

VVDI MB Tool All Keys Lost Programming for Benz W204 w207 (31) VVDI MB Tool All Keys Lost Programming for Benz W204 w207 (32)


Now use the new key to turn ignition on and off several time

VVDI MB Tool All Keys Lost Programming for Benz W204 w207 (33)

Read EIS data again

VVDI MB Tool All Keys Lost Programming for Benz W204 w207 (34)

Key 4 is activated done!

VVDI MB Tool All Keys Lost Programming for Benz W204 w207 (35)

Done!

http://www.uobdii.com/wholesale/xhorse-vvdi-mb-bga-tool.html

Top 8 BMW E39 scanner /diagnostic tool reviews Yes and No

$
0
0

Have BMW 5-Series (E39 chassis) to read all the basic systems, more than 8 BMW scanners are advised and attached with genuine user’s reviews, these scanners include INPA software running with K+DCAN cable, ISTA, EDIBAS, PA Soft, NCS Expert, WinKfp, Foxwell nt530/ nt520/, Schwaben unit, X431 Diagun, Autel Maxi check pro, snap-on solus pro, Peake R5/FCX-3 OBD2 reader etc. The price ranges from 18usd(INPA) to Foxwell NT530 (179usd) to over 600USD (lanunch, autel).

  1. So, have you considered theINPAsoftware suite . It is free. Though it requires a cable that costs about $30, and a Windows laptop with a USB port.

INPA of course reads pretty much everything. It displays faults in German however.

Here is one INPA software for free:

https://www.4shared.com/zip/VWi1bzg2ee/EasyBMWTools_Mikes_.html

Google “bmw k+dcan cable switch” to buy the cable, actually, as to the INPA software, you will get it on a CD when you buy that cable., and then you don’t need to take risk to download the free software with virus.

  1. There are various links in the forum to download EDIBAS (OS for INPA) or you can get prepackaged deals or other direct providers.
    Depending on the version you may need either a WindowsXP SP3 System, emulator, or modern. It may need to be a standalone unit (nothing else on it). You may also need to “tinker” with the files so everything works.
    INPA is the developer level software: powerful and if you mess up van brick stuff.

DIS is the old-school dealer level: more limited but can do everything a dealer can do, harder to brick.

ISTA is the modern dealer level: roughly same as DIS just different layout.

Each has their lovers and haters. You have the cabin connection only, so easier for you to use but still awkward if Test driving etc.

If you were closer I’d let you use my extra EDIBAS system, but by the time of paying shipping to CA you’d probably have a handheld or other system paid (or mostly) for.
Another option is the Creator 310 (might have a 510 now?). It is a handheld scanner for about $40-50. It is fine but only a scanner (no coding or programming) for diagnostics. I’d say about 20%(?) have had issues of incorrect readings or not working out of the box.

I have a review of the Foxwell/Schwaben unit on the forum, same on the Carly.
There are others (autel, SnapOn, etc) with varying levels of capability and price.

  1. I use a couple of things:
    I have a Peake R5/FCX-3 OBD2 reader that I keep in the car. It is powered by the OBD port and reads and clears most BMW-specific codes, although it does not reset the ABS light. . It has a small paper manual that lists the codes. you can pick one up used on Ebay or craigslist for $50.I also have INPA, PA Soft, NCS Expert, WinKfp, etc loaded on a dedicated windows XP laptop with the appropriate cable. I uses these tools to code in or out certain features – like turning off automatic door lo locks. daytime running lights, etc. I can also use these tools to read and clear error codes.I really try to avoid the “generic” readers that just list “p” codes, but I recently purchased OBDFusion on my iphone and use it with a wifi OBD2 reader. It provides live data while driving and has some great logging capabilities. I have used it recently to identify a lean condition I am working to fix.

4.

I personally use Foxwell NT530 with BMW software (ordered nt520 they sent me a nt530, saying nt530 can cover F series models), it is a plug-and-play scanner without loaded on one computer.

Very pleased. it performed Check codes, bleed brakes, see live data, compare data, clear codes all done with ease and I can keep it in the door pocket of the car to carry with me all the time.

I have the buy the cable software is free and use a laptop setup for another car (Durametric) and much prefer a handheld.


Foxwell NT530 is the best scanner for the money.

if your car is preface lift you will need the 16pin to 20pin round cable to read all modules in the car from under the hood.

And for BMW diagnosis / scan, purchase Foxwell NT530 with BMW software preinstalled will be better.

Differences between the ECS/Schwaben and Foxwell:

Both are 100% the same, they have same functionalities. Foxwell is the maker of the software and producer of the tool. So, Schwaben and ECS gets their support from Foxwell.

  1. I use SnapOn Modis Edgeand it works well. I cannot code keys but can see about every module.
  2. Carly has had a ton of BMW users, but lately has had a ton of bad press for lack of support, etc. Caveat emptor
  3. Just got Launch X431 Diagun, shipped directly from China, I opened the box but didn’t have time to register and set it up yet. It said to be able to do bi-directional control and is pretty powerful professional level scanner, I am excited to try on my 3 cars, E39 540i, E70 X5 and 2nd gen Saab 9-3. My 540i has this trifecta for over a years, I think I need to bleed ABS, this scanner can do ABS bleeding, it even said it can program keys, I saw someone on youtube programmed a Chevy key with this scanner.

  1. I have an old snap-on solus pro, works fine on all modules i also have an Autel Maxi check pro, also works fine with all modules, for the price & what it can do im really happy with it.

Conclusion:

Really depends on the depths you want to go, usability, and where/when. A laptop requires a cable power(or dependable battery), a handheld is powered from the vehicle, and there is also the smartphone option (powered from vehicle). Each has pros and cons with varying levels of support and cost.

01.2019 Volvo PROSIS Requirement, Login, Install, How to Use

$
0
0

Tips and guides for 01.2019 Volvo PROSIS Offline users:


Information:

Files Name: Volvo PROSIS Offline 2019-01 3.16.28 Multilingual

Version: 3.16.28.0

License Type: Full_version

First Release: May 11th, 2019

Languages: Multilingual – English, Spanish, German, French, Japanese

Region: All regions


Prosis Computer Requirements:

  • Supported OS: Windows 10 / Windows 8.1 /Windows 7
  • Processor: Multi core Intel i5 Series or above, Xeon or AMD equivalent
  • RAM: 8GB (16GB or more recommended)
  • Free Hard Disk Space: 16GB (32GB or more recommended)


Volvo PROSIS login:

You can login to PROSIS PRO with your PROSIS Web user name and password.

If you don’t have an account, pls go to

http://www.uobdii.com/wholesale/volvo-prosis-2013-parts-repair.html

Here, you have good luck to enjoy Prosis without any requirement of username and password

volvo-prosis-offline


Volvo PROSIS install:


Volvo PROSIS how to use:

Program Volvo Prosis contains information on repair and spare parts catalog for construction equipment Volvo.

Parts catalog Volvo PROSIS contains contains detailed repair and workshop manuals, electrical wiring and hydraulic diagrams and electronic part catalogue for Volvo heavy machinery.

Articulated Haulers (ART), Asphalt compactors (COA), Backhoe loaders (BHL), Compact excavators (CEX), Compact wheel loaders (CWL), Excavators (EXC), Feller Bunchers (FEL), Motor graders (GRD), Pipelayers (PLC), Road wideners (RWD), Screeds (SCR), Skid steer loaders (SSL), Soil compactors (COS), Tracked milling equipment (MET), Tracked pavers (PAT), Wheel Loaders (WLO), Wheel milling equipment (MEW), Wheeled pavers (PAW).

In the catalog, you will find detailed repair manuals Volvo, electrical and hydraulic diagrams, special instructions for all models of equipment guidelines for the management and maintenance, engine specifications, test results of all the equipment, the moments of puffs, filling volumes and a catalog of special tools.
Parts catalog contains catalogs of details of almost all products Volvo Construction Equipment.

The search of spare parts can be made in several ways: by factory replacement parts or serial code number. Each part is accompanied by a detailed description of the installation site with the image in order to avoid confusion or mistakes. In addition, the program Volvo Prosis gives a detailed description of the details, including the size and specification.

Service information includes following function groups:
All function groups
(0) GENERAL
(1) STANDARD PARTS, SERVICE
(2) ENGINE WITH MOUNTING AND EQUIPMENT
(3) ELEC. SYSTEM; WARNING SYSTEM; INFORMATION SYSTEM; INSTRUMENTS
(4) POWER TRANSMISSION
(5) BRAKE
(6) STEERING
(7) FRAME; SPRINGS; DAMPING; AXLE SUSPENSION; WHEEL/TRACK UNIT
(8) MACHINERY HOUSE; CAB; EXTERIOR TRIM PARTS ANYWHERE
(9) HYDRAULIC SYSTEM; DIGGING / HANDLING / GRADING EQUIPM.; MISC. EQUIP.


Volvo PROSIS vs. Tech Tool:

Volvo Prosis is parts and service information. Techtool is the program used to interface with the equipment.

Volvo prosis is off road repair and product information. Volvo PTT and Vcads is for diagnostics But both work very wel

Volvo Prosis: http://www.uobdii.com/wholesale/volvo-premium-tech-tool-ptt-2-7-25-vocom-software.html

Volvo Tech Tool: http://www.uobdii.com/wholesale/volvo-prosis-2013-parts-repair.html


Which Chrysler remote for which car model?

$
0
0

Can the mini key tool help me figure which one goes to which vehicle?


Here, I’ll make a post that’ll be worth while.

Sure, the 2 Chrysler remotes may be Chinese knockoffs, maybe not. Guys, provide a bit of insight.

We’ll start with the FOBIK. Crack it open, look at the board, does it have 5 dots above the battery? Even the Chinese ones do. GQ4-53T

If it’s a IYZ, then this is the OEM version, but at least you’ll know what you have.

The 1st pic, GQ4-53T

The scoop with the RHK, it can be either an M3N, or OHT. The Chinese are kind enough to mark the board, but a recase isn’t quite as easy. I’ll send a pic, actually a chart. Look at the bottom right, that’ll tell you how to identify which board it is.

chrysler-remote-vehicle-1


ITZ-C01C

chrysler-remote-vehicle-2


OHT/M3N

If it’s a IYZ, then this is the OEM version, but at least you’ll know what you have.

chrysler-remote-vehicle-3


Vehicles: KOB – OHT – M3N


credits to Adam Ackels

Benz DoIP Hu5 Hu6 Hu7 coding programming retrofit with DTS Monaco 8.13.029

$
0
0

This article is available with Benz DoIP Hu5 / Hu6 / Hu7 diagnosis, coding, programming , retrofit using DTS Monaco 8.13.029 (newest) running on mb sdconnect c4 plus or ecom.

dts-monaco-8-13-029-on-benz-hu5-01

DTS Monaco 8.13.029 test reports: Confirmed

  1. Quick test : quick test of the whole vehicle ECU, meanwhile it allows to edit more functions. (DoIP ECU available)
  2. Variant coding: with variable code to add VO-delete VO function. perfectly and quickly.
  3. Flash programming: achieve complete offline programming
  4. Diagnostic Trouble codes: read out fault codes with definition.
  5. Data Display /IO Control
  6. Complete vehicle coding quickly: read all ECUcoding data of the vehicle at one time, can be written to the vehicle again, completely offline operation.
  7. ECU exchange: two identical ECUs that exchange data by reading data and importing data.
  8. Symbolic Trace: Record the trace file, watch it offline and analyze the fault logic point.
  9. IDidentification; one-click to read all module programming numbers of the entire car and save.
  10. DiagnosticServices: advanced features can see the internal and external data of the module you choose, turn on the computer authorization (not the driving authorization), activate the ECU, reset the ECU, and modify the original frame number.


DTS Monaco 8.13.029 coding, programming, enable the hidden features, Retrofit etc.

212 installed electric folding mirror example
212 airbag unlock example
212 close start and stop function example
212 open corner auxiliary light example
212 keyless entry modification example
212 close engine fault light example
212 close the seat belt sound reminder instance
212 open sound and light synchronization example
212 Change ESP Computer Chassis Number Example
212 daytime running lights at night
212 Change the number of blinking lights
212 installed electric tailgate example
212 installed original atmosphere lamp example
212 low with headlights upgrade deployment headlights example
205 add folding mirror instance
205 retrofit seat memory example
205 installed original atmosphere lamp example
205 retrofit image example
205 change host boot screen instance
205 open sound and light synchronization example
205 close the seat belt sound reminder instance
205/222 installed electric tailgate example
205/222 add keyless entry instance
205/222 Change the number of blinking lights
205/222 cancel driving to watch DVD restrictions
166 cancel urea system example
164 urea alarm solution


Youtube video:

DTS Monaco 8.13.029 running together with mb sdconnect c4 plus to diagnosis, coding, programming Benz Hu5.

视频代码


1.Reset DTS Monaco 8.13.029.

dts-monaco-8-13-029-on-benz-hu5-02 dts-monaco-8-13-029-on-benz-hu5-03 dts-monaco-8-13-029-on-benz-hu5-04 dts-monaco-8-13-029-on-benz-hu5-05 dts-monaco-8-13-029-on-benz-hu5-06

2.Administrate and manage DTS projects.

Click on ” Administrate and manage DTS projects”.

System settings : Directories, Language, Interfaces (incl. eCom, sdconnect etc), Interfaces CBF, Java, Licenses.

Project administration, open “HU5, HU55, HU6. HU7 etc”.

Libraries: CBF, SMR, OTX.

dts-monaco-8-13-029-on-benz-hu5-07 dts-monaco-8-13-029-on-benz-hu5-08 dts-monaco-8-13-029-on-benz-hu5-09 dts-monaco-8-13-029-on-benz-hu5-10(01) dts-monaco-8-13-029-on-benz-hu5-10 dts-monaco-8-13-029-on-benz-hu5-11

dts-monaco-8-13-029-on-benz-hu5-12 dts-monaco-8-13-029-on-benz-hu5-13 dts-monaco-8-13-029-on-benz-hu5-14 dts-monaco-8-13-029-on-benz-hu5-15 dts-monaco-8-13-029-on-benz-hu5-16

3.DTS Monaco 8.13.029 performs diagnosis, coding, programming etc.

Click on ” Create a new workspace”.

Tick off  “SDCONNECT” and “ISO DoIP”.

Quick test, as you can see, DoIP ECU available.

Variant coding and Flash programming perfectly and quickly.

Diagnostic Trouble codes: read out fault codes with definition.

Data Display /IO Control.

Complete vehicle coding quickly

ECU exchange

Symbolic Trace

Save changes.

4.Back to click on “Recently used workspaces”.

DTS Monaco HU55OK [HU55] is save perfectly.

dts-monaco-8-13-029-on-benz-hu5-30


Good to know:

Cbf and smr-d are entry license files,
The cbf file is applicable to models: 117, 156, 163, 164, 166, 168, 169, 170, 171, 172, 176, 203, 204, 207, 209, 211, 212, 217, 218, 219, 220, 221, 245, 246, 230, 231, 251, 292, 240, 450, 451.

Smr-d is suitable for models: 205, 253, 222, 453, etc.

cff and smr-f are programming files, and cff files correspond to cbf programming files.
The Smr-f file corresponds to the programming file of smr-d


SMR-D file path:
C:\Program Files (x86)\Mercedes-Benz\Xentry \Kontexte \ODXProjekte \PKW_COMMON\dbr

CFF and SMR-F file paths:
C:\Program Files (x86)\Mercedes-Benz\SDFIash\Release\PKW


DTS Monaco VS Vediamo

Function DTS Monaco Vediamo
Whole vehicle coding, one-key save access Yes No
Whole vehicle control unit software number one-key storage Yes No
Whole vehicle fault code reading Yes No
Data exchange Yes No
Quick test Yes No
Single control unit one-key offline coding Yes No
Offline programming Yes Yes
Increase and reduce the SA code Yes Yes
Personalize control unit parameters Yes Yes


Thanks.

Good key programmer for Audi, VW, Skoda, Seat

$
0
0

What is good programmer for VAG cars (Audi, VW, Skoda, Seat), I recommend Xhorse VVDI2, XTOOL X100 PAD2, OBDSTAR DP Plus etc. Comes with some using experience and market price.


Part 1. Xhorse VVDI2 VW MQB key programming feedback Yes and No

VV-01 VAG 4th immobilizer (VW/Audi/Skoda/Seat/Porsche/Bentley)

vvdi-vag-copy-48-transponder

VV-02 VAG 5th immobilizer: VW/Audi incl. A4(2009- ), A5, Q5, A6 (2012-), A7, A8(2011-),Touareg(2011-)

Tutorial: http://blog.uobdii.com/vag-5th-immo-make-dealer-key-device-tutorial-wiring/


VV-03 VAG Copy 48 transponder by OBDII


VV-05 VAG MQB Immobilizer


read/write EEPROM

read/write immo data

read START/STOP key data

add a new key

program a new key (when all key lost)

read PIN

coding calculator

OBD read BCM2

BDM read BCM2

check key status

make dealer key

learn key


MQB capability:

Audi A3/S3 2014+

Audi Q2

VW Golf7

VW Polo(MQB)

VW Tiguan II

VW Touran II

VW crafter 2017+

VW Passat B8 without virtual cockpit

Skoda Octavia III 2014.07+

Skoda Rapid 2015.06+

Skoda Kodiaq

Skoda Superb III

Seat Ibiza/Ateca/Toledo 2015.06+


VVDI2 programs VW MQB Smart Key

https://www.youtube.com/watch?v=Ix1-sqZW_Cc


How to use VVDI2 program VW MQB NEC35XX Smart Key?

https://www.youtube.com/watch?v=Y8jfDv8yKTY


User Manual of VVDI2 programs new keys to VAG when all keys are lost

Lost all keys is same with add key type:

NEC+95320, Motorola 9S12XHZ512(Golf6 MM7 – 2011), NEC+95320(Johnson Controls), NEC+95320(JCI – 2013 Bora/Jetta), Visteon, Audi A4 – Crypto RB4, Audi A4 – Crypto RB8 etc. Lost all key is same with add key with working key, no extra operation. Other login type have special procedure
 OBD lost all keys:

All 4th immobilizer system can make a dealer key via OBDII directly. Don’t need BDM read cluster EEPROM, only require know PIN and 6 bytes CS. PIN and CS can read from Engine Control Unit function via OBDII. Detail can be found in Key Learn->Key Learn->OBD Lost All Key method
 Service mode lost all keys:

Some login type cannot read immo data while lost all working key. Login type include (CDCxx+24C32, A3/TT/R8 (CDC32xx), NEC24C32, NEC24C64, NEC24C64(2012 TFT color display), NEC24C64(2013-), NEC24C64(2013 TFT color display), Audi A1, Audi Q3). This type can make dealer key with following steps:


1) Activate OBD communication by open dangerous light, press on the brakes for several times. Backup ABS coding, you can run backup function on bottom right corner, or enter diagnostics 03 ABS, backup abs coding
2) Find EEPROM chip from instrument, usually use 24C32 or 24C64 chip, read EEPROM dump with BDM programmer and save as original EEPROM dump
3) Enter “Service Mode”, load original EEPROM dump and prepare service EEPROM dump. Attention: DON’T overwrite the original EEPROM dump
4) Write service EEPROM dump to EEPROM chip (24C32 or 24C64)
5) Restore dashboard to car
6) Back to main window and select right login type
7) Load original EEPROM dump (IMPORTANT!!!)
8) Activate OBD communication by open dangerous light, press on the brakes for several times
9) Press “Write EEPROM” write original dump to dashboard via OBDII (IMPORTANT!!!)
10) After write success, read immo data and save (IMPORTANT!!!)
11) Make a new dealer key and add to immobilizer system
12) If car use keyless key, learn the dealer key with learn method (with immo data support)
13) Start engine with new dealer key, complete


VVDI2 Price:

$2,100

Source: http://www.uobdii.com/wholesale/xhorse-vvdi2-full-kit.html

including these authorization VB-01 BMW OBD, VB-02 BMW CAS4, VB-03 FEM/BDC Function, VP-01 Porsche immo data tool, VPSA-01 PSA, VK-01 Transponder Programmer, VJ-01 Passthru J2534 etc


Top 2. Xtool X100 PAD2 VAG cars tested: Success and Failure

VW:

Golf 2010 4th immo: NEC + 24C32, read immo data, make dealer key OK.

4 2010 add key ok

Seat ibiza 2015 add key ok

Programming of OEM key on VW Touareg 2016

VW Golf 2004 works

2010 Audi A3 program remote function very fast with no issues

I notice copy 48 transponder (96 bit) function under VAG Immo Menu in x100 Pad 2.

function under VAG Immo Menu copying 4th immo 96bit key:

1.upload data

2.download data,

3.Copy key,

4.Make dealer key

golf 2003 read add key okay
gol 2012 g5 add key okay
voyage 2009 add key okay
santana 2005 add key okay
parati 2007 add key okay
fox 2008 add key okay.

Vw Sharan 2003 add key ok
Vw golf4 2001 no pin code reading, program key ok.

Vw Passat 2004 read pin code ok program key ok!

make MQB key for skoda fabia 2016 with bad2


Audi Q7 2008 mileage correction – OK
done the job under menu 2009-2011 – waiting time around 20 minutes, must be patient


VW Polo 6R 2011 – black dash – mileage correction – OK

skoda


Audi TT 2001 read pin,add key and remote all ok


2007 Audi A4 2.0 TDi add remote 2 mins very good shows what slots are programmed and lets you pick slot 1-4 for new remote.
MVP failed


Golf 6 2010, copy thansponder OK, read immo data OK, make dealer key OK.


Golf 7 MQB key, add key with KC100: OK

Golf 7 MQB


Seat:

seat altea 1.9 tdi 2008 add new remote (wich is programed by vvdi tool) succes!!
key adding nit tryed( don’t have pin pin read fail) new id48 copyed by silca rw4+.


Seat Leon 2000 year:
Read PIN: Reads Wrong Pin (vag tacho 5.0 read correct Pin)
Add Key: OK
Add Remote: OK
KLM adjustment: OK

Seat Leon 2003 year:
Read PIN: OK
Add Key: OK
Add Remote: OK
KLM adjustment: OK

Seat Leon 2004 year:
Read PIN: OK
Add Key: OK
Add Remote: OK
KLM adjustment: OK
All are using cluster VDO K-line


XTOOL X100 PAD 2 Program 4 & 5 Gen Immo for Audi A6:

https://www.youtube.com/watch?v=uWgfT18hhNU


Xtool X100 Pad2 VAG coverage:

Browse http://www.xtooltech.com

Go to option “Products”, then “X100 PAD2” or “X100 PAD2 Pro”.

Click on “Immobilizer”, then “VW” , “Audi”, “Seat”, “Skoda” etc.


Price

Xtool X100 Pad2 full package (with 4th & 5th generation VAG and KC100 adapter) …828USD

Xtool X100 Pad2 standard package …659USD


Top 3. OBDSTAR DP Plus VAG IMMO reviews

I have x300 dp plus full

work perfect


Yes and no:

https://www.digital-kaos.co.uk/forums/showthread.php/647853-X300-Pro3-and-DP-pad-and-keymaster-DP-yes-or-no-fail-success/


  1. OBDSTAR X300 DP Plus Adds New Key for VW 4th IMMO

https://www.youtube.com/watch?v=V6gOf_iIVyI

Benz W212 W205 W222 code, program, retrofit offline by Sdconnect c4 / ecom

$
0
0

Topic: how to offline code, program, retrofit Benz W212 W205 W222 using sdconnect c4 plus (2019 version) / ecom etc. Such as upgrade low configuration headlights to high configuration headlights, enable and disable some functions etc.


Part 1: Benz W212 retrofit, program, code offline by sdconnect c4 plus

1.Retrofit W212 electronic folding mirror (dashboard coding).

benz-w212-retrofit-program-code-offline-by-sdconnect-c4-plus-01


2.W212 airbag unlock.

benz-w212-retrofit-program-code-offline-by-sdconnect-c4-plus-02

benz-w212-retrofit-program-code-offline-by-sdconnect-c4-plus-03


3.W212 turn off the start and stop function.

benz-w212-retrofit-program-code-offline-by-sdconnect-c4-plus-04


4.W212 enable the curve light

benz-w212-retrofit-program-code-offline-by-sdconnect-c4-plus-05 benz-w212-retrofit-program-code-offline-by-sdconnect-c4-plus-06


5.W212 keyless-entry retrofit.

benz-w212-retrofit-program-code-offline-by-sdconnect-c4-plus-07 benz-w212-retrofit-program-code-offline-by-sdconnect-c4-plus-08


6.W212 turn off the check engine light on.

benz-w212-retrofit-program-code-offline-by-sdconnect-c4-plus-09


7.W212 turn off the seat belt warning chime.

benz-w212-retrofit-program-code-offline-by-sdconnect-c4-plus-10 benz-w212-retrofit-program-code-offline-by-sdconnect-c4-plus-11


8.Temperature Conversion: Fahrenheit to Celsius.

benz-w212-retrofit-program-code-offline-by-sdconnect-c4-plus-12


9.W212 synchronize sound and light.

benz-w212-retrofit-program-code-offline-by-sdconnect-c4-plus-13


10.W212 Change ESP chassis number.

benz-w212-retrofit-program-code-offline-by-sdconnect-c4-plus-14


11.W212 Turn daytime running lights on at night.

benz-w212-retrofit-program-code-offline-by-sdconnect-c4-plus-15


12.W212 Fix Turn Signals Blinking Fast

benz-w212-retrofit-program-code-offline-by-sdconnect-c4-plus-16


13.W212 retrofit electronic rear door (gateway coding).

benz-w212-retrofit-program-code-offline-by-sdconnect-c4-plus-17


14.W212 or 218 retrofit the original ambient Light (gateway enable the coding).

benz-w212-retrofit-program-code-offline-by-sdconnect-c4-plus-18


15.Low configuration headlights upgraded to igh configuration headlights (dashboard coding)

benz-w212-retrofit-program-code-offline-by-sdconnect-c4-plus-19


16.Low configuration headlights upgraded to high configuration headlights (front SAM coding)

benz-w212-retrofit-program-code-offline-by-sdconnect-c4-plus-20


Part 2: Benz W205 W222 retrofit, program, code offline by sdconnect c4 plus

1.Add the folding rear mirror (gateway coding) to W205.

sdconnect-c4-retrofit-program-code-benz-w205-w222-offline-01


2.add memory seats to W205 (gateway).

sdconnect-c4-retrofit-program-code-benz-w205-w222-offline-02


3.Add the fragrance system (Air conditioning coding) for W205.

sdconnect-c4-retrofit-program-code-benz-w205-w222-offline-03


4.Add electronic tailgate (kick to open) for W205 W222.

sdconnect-c4-retrofit-program-code-benz-w205-w222-offline-04


5.Add the original keyless entry (KG computer coding) for W205 W222.

sdconnect-c4-retrofit-program-code-benz-w205-w222-offline-05


6.Add reverse image for W205.

sdconnect-c4-retrofit-program-code-benz-w205-w222-offline-06


7.Turn off start stop function (SAM coding) for W205 W222.

HU5 is Benz DoIP, that needs newest sdconnect c4 plus or Benz ecom.

Type1: Benz

Type2: AMG

Type3: Maybach

sdconnect-c4-retrofit-program-code-benz-w205-w222-offline-07 sdconnect-c4-retrofit-program-code-benz-w205-w222-offline-08


8.Synchronize the sound and light (Reversing radar code) for Benz 205.

sdconnect-c4-retrofit-program-code-benz-w205-w222-offline-09


Done.


Thanks.

How much do you know i-HDS diagnostic sw & J2534 reprogramming sw?

$
0
0

This is about the i-HDS (Honda Diagnostic System) software by American Honda Motor Co., Inc. It’s used for the diagnosis and repair of electronic systems on Honda and Acura automobiles, and for the reprogramming of electronic control units (including, but not limited to, ECMs and PCMs). This software provides access to all Honda and Acura vehicle systems (access to the immobilizer security system requires a Security Professional level software subscription and Vehicle Security Professional [VSP] registration with NASTF). To use the i-HDS software, you need to purchase one of our convenient subscription options. In addition, you will need a pass-thru Vehicle Communication Device (VCI) that is compliant with SAE J2534-1 and J2534-2 in order to communicate with the vehicle.

Honda Diagnostic System

Minimum PC Requirements for the i-HDS Software

Processor Speed 2.0 GHz
Memory 4 GB of RAM
Hard Drive Space 20 GB free
Video Resolution 1024 x 768, 16-bit color
Network 10/100 Mbps Ethernet or Wi-Fi equivalent with internet access
I/O Ports USB 2.0
Operating System 32-bit or 64-bit versions of Microsoft Windows 7, 8, 8.1, or 10
Hardware Accessories generic keyboard and pointing device


Vehicle Communication Interfaces (VCI)


The i-HDS software supports the use of a generic pass-thru VCI that is compliant with SAE J2534-1 and J2534-2. However, Honda recommends the Denso DST-i or the Bosch MVCI for use on Honda and Acura vehicles, as Honda has worked closely with these manufacturers to ensure their hardware and our software interact safely and within the J2534-1 and -2 specifications, for both diagnostics and reprogramming. If you choose to use a generic VCI, please carefully consider the customer and technical support options you will receive from your chosen device supplier. Honda does not provide technical or customer support for generic VCI devices.


The VCI Application Table below lists devices that either are approved and supported by Honda or are known to have completed and passed an independent, exhaustive validation program with i-HDS software suite.


Manufacturer VCI Name Version Information Notes
Firmware J2534 API
DENSO DST-i 2.00.0010* 04.04 This is the current generation VCI used by Hondaand Acuradealers. Hondaroutinely validates the functionality and provides customer support for this device.
Bosch MVCI  3.01.54* 04.04 This is the previous generation VCI used by Hondaand Acuradealers. Hondaroutinely validates the functionality and provides customer support for this device.
Drew Technologies MongoosePro Honda  1.7.7** 04.04 This company has completed an independent i-HDS validation and claims it to function with the i-HDS software. Honda does not provide ongoing validation, nor customer support for this device.
Dearborn Group d-briDGe Pro 3.303** 04.04 This company has completed an independent i-HDS validation and claims it to function with the i-HDSsoftware. Honda does not provide ongoing validation, nor customer support for this device.


* These versions may have been superseded. Honda provides the latest supported versions to current i-HDS subscribers.

** Version used in validation program. See Terms and Conditions and Important Notice Regarding Reprogramming below for more details.


Reprogramming with the J2534 Rewrite Application in i-HDS


Included in the i-HDS software suite is a new reprogramming application called J2534 Rewrite. This application is made available to all subscribers of the i-HDS software suite and replaces the previous generation software, J2534 Honda Pass-thru Reprogramming Software.

This new application is compatible with generic VCIs that comply with SAE J2534. It must be used to reprogram any Honda/Acura vehicle equipped with ECUs that support reprogramming. Refer to the table below for legacy applicability for the programming of ECMs and PCMs. Though system dependent, late-model vehicles may be equipped with other ECUs that support reprogramming as well, e.g. ABS or VSA. J2534 Rewrite must be used to reprogram these control modules, as instructed in an applicable service bulletin.

As shown in this table, not all legacy Honda/Acura models are equipped with a reprogrammable ECM/PCM. Furthermore, all 2007 and later models not listed in the table are fully supported with this application.

X= Reprogrammable


Terms and Conditions

The following statements describe American Honda Motor Co., Inc.’s (“Honda”) policies and terms of use for Honda’s i-HDS suite of diagnostic and reprogramming software. By using this software you acknowledge and agree to all terms and conditions stated herein. If you do not agree to these terms, do not use any component of the suite. You are responsible for proper diagnosis and reprogramming of Honda/Acura control modules. All problems and complaints that may occur from the use of any allegedly compliant J2534 devices are the sole responsibility of the device manufacturer. If you experience any problems, contact the device manufacturer. Honda will not provide technical support.

The VCI Application Table above is voluntarily provided by Honda as a courtesy to its aftermarket customers. While the i-HDS software suite has been validated to be J2534 compliant by several third-party device manufacturers, it is the responsibility of the device manufacturer to ensure and maintain the interoperability of its device and our i-HDS software. Device manufacturers listed above that have completed an independent validation of i-HDS attest that those specific devices are both J2534compliant and work with the i-HDS suite. If Honda determines that a device listed above is no longer compliant with the J2534 standard or is not compatible with the i-HDS suite, Honda may elect to remove the device from the list without notice. Furthermore, the applicability scope of the devices above is limited to Honda/Acura vehicles intended for sale in North America. Device compatibility with Honda/Acura vehicles for sale outside of the North American market is not guaranteed and may not meet the standards of that market.

All reprogrammable Honda/Acura ECUs/ECMs/PCMs comply with the SAE J2534 standard. You are responsible for using a compliant J2534reprogramming device. Contact the reprogramming device manufacturer to confirm Honda/Acura compatibility before use.

Honda will NOT be responsible for damaged control units/modules.


HONDA MAKES NO WARRANTIES OR REPRESENTATIONS, EXPRESS OR IMPLIED, IN FACT OR IN LAW, INCLUDING THE IMPLIED WARRANTIES OF MERCHANTABILITY AND FITNESS FOR A PARTICULAR PURPOSE. IN NO EVENT WILL HONDA BE LIABLE FOR INCIDENTAL, SPECIAL OR CONSEQUENTIAL PENALTIES OR DAMAGES, INCLUDING LOST PROFITS.


These Terms & Conditions are subject to change without notice.


Important Notice Regarding Reprogramming


Do NOT program a control unit/module unless you are directed by a service procedure or an applicable Honda/Acura Service Bulletin. Control unit/module updating should only be undertaken by a skilled professional using proper equipment and procedures, or damage can occur. Updating control units/modules to the latest software not associated with a specific symptom may not resolve other specific customer concerns. Unauthorized or self-directed programming may cause unintended and irreversible effects and lead to vehicle harm and/or customer dissatisfaction.


Honda urges end users to always use the LATEST production release of the J2534 Rewrite software in the i-HDS suite. Using the latest version of the software is the best way to ensure successful reprogramming of applicable control units/modules.


It is possible to damage the vehicle’s electronic control units/modules during reprogramming. Ensure the following conditions are met BEFORE programming a control unit/module:

The vehicle battery must be fully charged before programming the control unit/module. Stable battery voltage is critical during programming. Any fluctuation, spiking, over voltage, or loss of voltage will interrupt programming.

Turn OFF or disable any system that may put a load on the vehicle battery.

Make certain all tool connections are secure. Do NOT disturb the tool harnesses while programming. If an interruption occurs during the reprogramming procedure, reprogramming failure or control unit/module damage may occur.

THE REPROGRAMMING PROCEDURE MUST BE FOLLOWED EXACTLY AS OUTLINED BY THE SOFTWARE AND/OR SERVICE INFORMATION. FAILURE TO FOLLOW THESE INSTRUCTIONS WILL CAUSE THE REPROGRAMMING EVENT TO FAIL.

Some units/modules may require additional programming/setup events performed before or after programming. Please refer to the appropriate Service Bulletins for details. (e.g. IMA Battery Module)


Warning: Certain control module systems require special procedures and or hardware to be properly reprogrammed. 


Source: https://honda.oemdtc.com/ (Pls correct me if there is something wrong)

BMW CAS4 / CAS4+ remote key programming using VVDI2 by OBD

$
0
0

Car model: BMW 730LD CAS4, CAS4+


Purpose: Reading and programming, until the key can start the car successfully and remote programming successfully.


Using tools:

Xhorse VVDI2 V6.6.1 + OBD cable

bmw-cas4-cas4+-programming-using-vvdi2-and-obd-cable-01


Procedure:

Click on “BMW” in the VVDI2 Installer Version: V6.6.1

bmw-cas4-cas4+-programming-using-vvdi2-and-obd-cable-02


Connecting to device, please wait…

Click on “Connect”.

bmw-cas4-cas4+-programming-using-vvdi2-and-obd-cable-03


Key learn -> CAS Key Learn -> CAS4/CAS4+ -F series

bmw-cas4-cas4+-programming-using-vvdi2-and-obd-cable-04 bmw-cas4-cas4+-programming-using-vvdi2-and-obd-cable-05


Connected. Start transfer/receive…

Now reading key info…

Click on “Get Key Info”, then “OK”.

Attention: Prepare dealer key and reset KM require unlock CAS4, enable key and disable key no need unlock CAS4.

bmw-cas4-cas4+-programming-using-vvdi2-and-obd-cable-06 bmw-cas4-cas4+-programming-using-vvdi2-and-obd-cable-07


Click on “Unlock CAS4/CAS4+”, then “Yes” to continue to save the data.

bmw-cas4-cas4+-programming-using-vvdi2-and-obd-cable-08 bmw-cas4-cas4+-programming-using-vvdi2-and-obd-cable-09


In several seconds, CAS4/CAS4+ unlock success. You can make dealer key or reset KM via OBDII.

bmw-cas4-cas4+-programming-using-vvdi2-and-obd-cable-10 bmw-cas4-cas4+-programming-using-vvdi2-and-obd-cable-11


Click on “Prepare dealer key with programmer”.

Attention “Please choose the key position where you want to do the operation”.

Choose Key8.

bmw-cas4-cas4+-programming-using-vvdi2-and-obd-cable-12 bmw-cas4-cas4+-programming-using-vvdi2-and-obd-cable-13


Tick off ” Have a working key. Switch ON ignition with working key and continue”, click on “Next”.

bmw-cas4-cas4+-programming-using-vvdi2-and-obd-cable-14 bmw-cas4-cas4+-programming-using-vvdi2-and-obd-cable-15


Please record the following information…

CAS4/CAS4+ security key:…

DME/CAS security key…

Key/CAS security key …

ECU ISN…

bmw-cas4-cas4+-programming-using-vvdi2-and-obd-cable-16


Read attention 1 to attention3…

Click on “Yes” if you have one working key, click on “No” if you have no one working key.

bmw-cas4-cas4+-programming-using-vvdi2-and-obd-cable-17


Input original key (Support disable key) to VVDI2 programmer and press OK.

bmw-cas4-cas4+-programming-using-vvdi2-and-obd-cable-18


Please put a new key into VVDI2 programmer.

bmw-cas4-cas4+-programming-using-vvdi2-and-obd-cable-19


Make key complete.

bmw-cas4-cas4+-programming-using-vvdi2-and-obd-cable-20


Car Start successfully.

Remote programming successfully.

bmw-cas4-cas4+-programming-using-vvdi2-and-obd-cable-21 bmw-cas4-cas4+-programming-using-vvdi2-and-obd-cable-22 bmw-cas4-cas4+-programming-using-vvdi2-and-obd-cable-23


For your information:

Question: For CAS4/CAS4+ all keys lost, do we still need ISN from ECU or does the new update not require it after unlocking the CAS ?

Answer: yes , it does need isn , if all key lost , you need to get the isn from ecu.

ACDP Porsche: 15 Cayenne DTS new key added! 13 Panamera all keys lost done!

$
0
0

Here are two tests I did today on Porsche. Key programmed using ACDP.

acdp-porsche

Link: http://www.uobdii.com/wholesale/yanhua-mini-acdp-programming-master.html


Test 1:

2015 Porsche Cayenne GTS adding a key with ACDP on bench.

Have generated a remote/key for a Porsche Cayenne 2015 using ACDP.

We will go thru the following steps:

-Remove BCM from car.

-Connecting ACDP adapters to BCM.

-Going over EXT1 AND EXT2 importance (ceramic or metal oscillators).

-Decrypting BCM, reading PFLASH, DFLASH and EEPROM.

-Generating key

-Writing back info to BCM.

-Verifying keys

acdp-2015-Porsche-Cayenne-GTS


Test 2:

2013 Porsche Panamera all keys lost encrypted BCM on bench with Yanhu ACDP

30 min job.

acdp-2013-Porsche-Panamera-1 acdp-2013-Porsche-Panamera-2 acdp-2013-Porsche-Panamera-3 acdp-2013-Porsche-Panamera-4


In summary,

it’s as good as advertised.

Yanhua Mini ACDP can add a new key even when all keys are lost fo Porsche 2010-2018:

Cayenne 2011-
Panamera 2010-
Macan 2014-
911 2011


Autel APB112 Smart Key Simulator User Manual

$
0
0

Look here: one little Autel APB112 Smart Key Simulator with one USB cable and one sheet of Quick Reference Guide

how-to-use-autel-apb112-smart-key-simulator-01

Source: http://www.uobdii.com/wholesale/autel-apb112-smart-key-simulator.html

This Autel APB112 is used to collect the data sent from the ignition coil, aiming to identify the ignition coil troubles and decode the data of the vehicle key chip. It can also simulate the vehicle key chip.


By working together any of Auro IM100, Auro IM600, Autel IM508 + XP400 box, Autel IM608, Autel MaxiIM IM508 etc, Autel APB112 Smart Key Simulator has these capabilities:

46, 4D data collection …Confirmed
46 smart key password calculation …Confirmed
46 chip simulation …Confirmed
Toyota 4D (94/D4, 98) smart key simulation …Confirmed
Toyota H (88/A8, A9, 39) smart key simulation …Confirmed
Collects data from the ignition coil …Confirmed
Identify ignition coil troubles …Confirmed
Decode vehicle key chip data …Confirmed
Simulate vehicle key chip (ex – 4D chip) …Confirmed

Toyota/Lexus smart key all key lost …Confirmed
Chip decoding (Hyundai 46) …Confirmed


5 Steps to use AUTEL APB112 Smart Key Simulator to collect data:

Before operating or maintaining this unit, please read these instructions carefully, pay extra attention to the safety warnings and precautions. Use this unit correctly and properly.  Failure to do so may cause damage and/ or personal injury and will void the product warranty.


Do Not disconnect the USB Cable when use


Steps:

  1. Plug the APB112 smart key simulator to Autel Diagnostic Device using the supplied USD cable.
    2. After connection, the status indicator lights solid blue, indicating that the APB112 smart key simulator is working properly and then automatically communicates with the diagnostic device.
    3. The APB112 smart key simulator application is automatically upgraded on Autel diagnostic device according to the selected vehicle system function
    4. Place the smart key simulator close to the ignition coil for data collection, which is used for decoding the chip. After decoding, the original car chip data can be copied.
    5. The emulator key chip can generate various types of key chips with subsequent upgrades according to requirements.

how-to-use-autel-apb112-smart-key-simulator-02


Interpretation of AUTEL APB112 indicator:

how-to-use-autel-apb112-smart-key-simulator-03

  1. Status Indicator – Indicates The Current Status
    1) Lights Solid Blue – the power supply is working properly and in default state;
    2) Falshes Green – the data interaction status;
    3) Flashes Red – the status of upgrading;
    4) Lights Solid Red – the boot status

    2. USB Interface – Provides power and data communication
    3. Product Information


Free download: Autel APB112 quick reference guide

Images:

how-to-use-autel-apb112-smart-key-simulator-04 how-to-use-autel-apb112-smart-key-simulator-05 how-to-use-autel-apb112-smart-key-simulator-06 how-to-use-autel-apb112-smart-key-simulator-07

Volvo VIDA/DiCE and Xenon lights auto adjustment

$
0
0

This is my experience of auto adjustment of Xenon lights.


Related Contents:

How to install VIDA2014D on Windows 8.1 / 10 Pro / Core x86 / x64 PC?

Multilingual VXDIAG Nano VOLVO Vida 2014D Win 7 8 10 free download

How to use Volvo Vida Dice 2014D to disable DRL light on Volvo XC90?


If a light motor fails, is there a default position the light fall to, to ensure that oncoming traffic are not dazzled?? ( mine, despite several SUM calibrations keep returning to a very low setting on one light)

If a 12v supply is run across the + and – terminal, would the motor be expected to run? – there are three terminals

Is this a way to test if a motor has failed?


Control modules have been read by DIce/VIda and are apart from a low emergency phone battery fault free. When doing a SUM calibration, DIce/Vida  does not like the voltage from the LH ride height sensor – saying its too high.(@3.94v) I have read on a forum that the l/h sensor feeds the range adjustment setup and the r/h sensor feed the 4C shocks – but i’m unsure if that is 100% true

Historically, I lifted the left side of the car until the reading was <3.5v and calibrated which Vida/Dice is happy about. However soon after recalibration the o/s light reverted to a low setting. Now the light does not appear to move due to suspension movement, hence my original question about how to tell if a motor had gone bad.

I have discovered that there is a position sensor fitted to the reflector, which explains perhaps  why the light drops back to a low setting shortly after manually lifting them. I have now ordered a L/H position sensor and will fit that before deciding whether to buy a new motor.


I have now finally got this sorted out.

New rear sensor did not sort it, so bought new motor for headlamp.

Good dip beam lighting now restored.

I leaned however our “R” for Xenons motors are much more expensive to buy than the normal halogen motors fitted to the rest of the V70 range, and harder ro get 2nd hand.

The only difference myself and another forum member in the Uk could find was the “post” which fits into the reflector housing is bigger in the Xenons than the halogens.

The small post pulls through the reflector unit

Stripping the motors down to swap the “post” over is relatively simple compared to some jobs I have done on my “R”.

On my “faulty motor” when I stripped the unit I found to motor had seized but after using my finger to rotate the motor a little and a std 9v radio battery to run it for

several minutes in each direction, I now appear to have a viable spare motor 🙂

The last

volvo-vida-sum-calibration

This is the only picture I took – after I disassembled it. Its all straight forward. Once the unit has the back removed the PCB is removed by remelting the two plastic legs which run up through the PCB. It then lifts up being careful to firstly unclip the pin from the PCB leg. The worm drive is located on two recesses at each end, just gently lever the motor end out first.

All that remains is to get the reflector unit out, which is removed by rotating the large white geared wheel, which releases the unit. The central pin which locates in the actual reflector and is adjusted by the 6mm white dome nut on the motor top can then be removed. .

There is no reason to do this as the reflector unit can be transferred as is to a new light motor.


The small electric motor is a snap in snap out. I levered mine out on the shaft.

Initially took me 30 minutes to disassemble as I was being careful not to damage / break anything – next one will be 3 mins max.

Cheers

Bob

Free download KTM Bench Wiring Diagram + Software + Driver

$
0
0

Topic: Free download KTM Bench wiring diagram + software + driver, 2 tips of using KTM Bench, pros of using KTM Bench to read the ECU data without dismantling the ECU box.


Free download KTM Bench wiring diagram + software + driver : https://mega.nz/#!B9oTQahI!HNlNhOuMYmYghLlLyCSECV6GyLbDJLg8wTZrv1J2m10

Password: No need

Security: 100% safe

Tokens: No need


Do’s and don’ts:

Don’t connect the computer network.

Don’t update the KTM Bench software

Otherwise the machine is locked and needs to repair.


The engineer teaches you how to properly use KTM Bench to read write the ECU data? There are 2 tips to follow:


First come with the connection of KTM Bench to the computer and the ECU.

ktm-bench-pcmflash-1.99-reads-sid208-ecu-data-01


Tip 1.

Choosing the ECU type and the CPU chip type to view the wiring diagram and read the ECU data.

Without dismantling the ECU, ktm bench pcmflash 1.99 can read all [71] ECU data by connecting to the GPT0 and GPT1 cable.

Take an example, you remove one edc17 c54 ECU box from the car, then the CPU is tc1797, you can refer to ktm bench wiring diagram to connect the ECU by connecting GPT0 and GPT1 cables, then choose the option 1797 cpu.

ktm-bench-pcmflash-1.99-reads-sid208-ecu-data-02 ktm-bench-pcmflash-1.99-reads-sid208-ecu-data-03 ktm-bench-pcmflash-1.99-reads-sid208-ecu-data-04 ktm-bench-pcmflash-1.99-reads-sid208-ecu-data-05


Tip 2:

As for [53] ECU reading and writing, the ecu needs to be dismantled and connect the boot point, which is as the same as ktmflash. Please read the password first, then choose “read the data”.

ktm-bench-pcmflash-1.99-reads-sid208-ecu-data-06 ktm-bench-pcmflash-1.99-reads-sid208-ecu-data-07


Pros of reading the ECU data without dismantling the ECU:

1). Easy to operate and save time up to 5-10 minutes.

Usually one professional will spend more than 20minutes to dismantle the ECU and even more than 1 hour, if unlucky the box may be damaged during dismantling.


2) Dismantling the ECU may damage the original ECU sealing condition.


3) After dismantling the ECU, the boot must be connected.


4) After reading out the data, it needs to reseal ecu.


Overview of KTM Bench programmer wiring diagram:

ktm-bench-pcmflash-1.99-reads-sid208-ecu-data-08 ktm-bench-pcmflash-1.99-reads-sid208-ecu-data-09 ktm-bench-pcmflash-1.99-reads-sid208-ecu-data-10 ktm-bench-pcmflash-1.99-reads-sid208-ecu-data-11 ktm-bench-pcmflash-1.99-reads-sid208-ecu-data-12 ktm-bench-pcmflash-1.99-reads-sid208-ecu-data-13 ktm-bench-pcmflash-1.99-reads-sid208-ecu-data-14 ktm-bench-pcmflash-1.99-reads-sid208-ecu-data-15 ktm-bench-pcmflash-1.99-reads-sid208-ecu-data-16 ktm-bench-pcmflash-1.99-reads-sid208-ecu-data-17 ktm-bench-pcmflash-1.99-reads-sid208-ecu-data-18 ktm-bench-pcmflash-1.99-reads-sid208-ecu-data-19 ktm-bench-pcmflash-1.99-reads-sid208-ecu-data-20


Thanks.


www.uobdii.com

How does Autel G-BOX work for Mercedes DAS3 All Keys Lost?

$
0
0

Mercedes Benz DAS3 All Keys Lost solution: have one Autel G-BOX + Autel MaxiIM IM608 /IM600. Or have one Autel G-BOX + Autel MaxiIM IM508 /IM100 + one Autel XP400. Done via OBD or done on Bench.


This is Autel G-BOX full package incl.

One main unit, two clamp cables, one K-line cable, one fuse cable, one OBDII extension cable, one DB15 cable, one quick reference guide, resistance and insurance etc.

autel-g-box-mercedes-benz-all-keys-lost-01


This article is available with:

Autel G-BOX Price and where to get one Autel G-BOX

Does Autel G-BOX work with IM100?

Guide on how to use the Autel G-BOX?


1.Autel G-BOX Price and where to get one Autel G-BOX?

Google search and you will find it is 125USD incl. shipping cost. like this one:

http://www.uobdii.com/wholesale/xp400-key-and-chip-programmer.html

If you purchase one from any other place, please confirm if the seller is authorized dealer, and can update online.


2.Does Autel G-BOX work with IM100?

Yes, it can. But IM100 needs to connect one XP400 adapter first, then G-box.


3.Guide on how to use the Autel G-BOX:

As you can see, the Autel G-BOX package contains one quick reference guide, and there are also instructions on the tool.

Free download Autel G-BOX quick reference guide


1)How to OBD program key when Mercedes Benz Vehicle all keys lost?
This method is suitable for Mercedes-Benz W204, W207, W216 and W164 EISs after the year 2009.

autel-g-box-mercedes-benz-all-keys-lost-02


How to connect step by step:
1)Plug the G-Box to the vehicle’ s OBDII.
2)Remove the fuse of vehicle EIS, connect the Relay ports to the fuse using the fuse cable (in the package).
3)When the vehicle has an ELV, plug to the K7 port and ELV plug using the supplied K-line cable.
4) Plug the G-Box to the Autel Diagnostic Tablet (MaxiIM IM608, IM508 +XP400 adapter).

2. How to do on bench When All Keys of Mercedes-Benz Vehicle are Lost
This Method is suitable for all Mercedes-Benz EISs that are already supported by Autel Diagnostic Tablet.

autel-g-box-mercedes-benz-all-keys-lost-03

How to connect step by step:

1.Plug the G-Box to the Mercedes-Benz EIS using the packed DB15 Cable
2.Plug to the DC port of G-Box using a power adapter (DV 12V)
3.Plug the G-Box to the Autel Diagnostic Tablet (MaxiIM IM608, IM508+XP400 adapter)


Next is Autel G-BOX test reports:

1.Mercedes-Benz all keys lost, faster password calculation.
– 8x times faster password calculation for EIS W172, W204, W207;
– 4x times faster password calculation for EIS w209, w211, etc.

2.Mercedes-Benz all keys lost, no more repeated insertions and removals of IR simulator
W164/-2008,W251/-2008,W164/2009-,W169,W251/2009,W216,W221(partial),W202(K)/W208(K)/W210(K), W203(K)/W463(K)

3.Mercedes-Benz all keys lost, can be programmed on the vehicle without removing the EIS
except for EIS W164/-2008, W251/-2008, W221, W202(K)/W208(K)/W210(K), and W203(K)/W463(K), all other EIS can be programmed on the vehicle directly.

4.Mercedes-Benz all keys lost, BMW DME/DDE ISN reading and writing in boot mode
23 categories of Bosch engine, including MEVD/EDC17. 6 categories of Simens/continental engine, including MSD/MSV engine.


Thanks.


www.uobdii.com

Free download VVDI Pro Bosch ECU adapter for BMW VW wiring diagram

$
0
0

This article is available with VVDI Pro Bosch ECU adapter wiring diagram (for BMW & VW).

The (ADAPTER) in the following parts means Bosch ECU adapter, with it vvdi pro can read BMW ECU N20 N55 B38 ISN without opening the ECU.


1.Free download VVDI Pro 4.8.6

https://mega.nz/#!Po5XBYBJ!ohwyr2AxAW-FF1nxZXnRQdHHoNjv7L4oLekAxuTxN80

Password: 123456


2.Double click on “VVDIProg.4.8.6.exe”.


3.Select “Type 10 Bosch ECU adapter” -> “BMW “.

vvdi-pro-ecu_bosch-01 vvdi-pro-ecu_bosch-02


4.Select any chip, then “Connection Diagram” to view.


Wiring diagram for MEVD17_2_3(B38)(ADAPTER),MEVD17_2_K(B38)(ADAPTER):

ECU_BOSH_TC1793


Wiring diagram for MEVD17.2.4_Exx(N20)(ADAPTER),

MEVD17.2.4_Fxx(N20)(ADAPTER),EVD17.2.9_Fxx(N20)(ADAPTER),MEVD17.2.9_Exx(N20)(ADAPTER), MEVD17.2.P_Fxx(N20)(ADAPTER), MEVD17.2.5(ADAPTER), MEVD17.2.8(ADAPTER),

MEVD17.2.H(ADAPTER).

ECU_BOSH_TC1797


Wiring diagram for MEVD17.2_Fxx(N55)(ADAPTER), EVD17.2.G(N55)(ADAPTER),

EVD17.2.6(N55)(ADAPTER) .

ECU_BOSH_TC1797(N55)


5.Select “Type 10 Bosch ECU adapter” -> “Volkswagen “.


Wiring diagram for Volkswagen ECU ME17.5.22(TC1724).

ME17_5_22(TC1724)


Wiring diagram for Volkswagen ECU MED17.5.25(TC1782).

MED17_5_25(TC1782)

Viewing all 3191 articles
Browse latest View live


<script src="https://jsc.adskeeper.com/r/s/rssing.com.1596347.js" async> </script>