Quantcast
Channel: UOBDII Official Blog
Viewing all 3197 articles
Browse latest View live

Xprog V6.12 where to free download & how to install on win 7 8?

$
0
0

This article is available with Xprog V6.12 software free download link, win7 8 installation guide, full chip list etc.


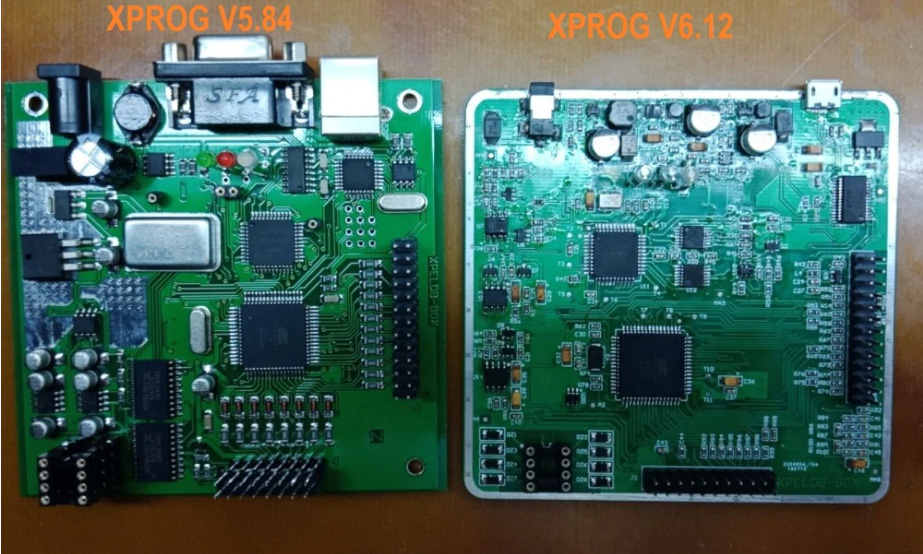
Read: Xprog V6.12 software vs Xprog 5.84


Free download Xprog V6.12 ECU programmer:

https://share.weiyun.com/5m5Vkw0

Password: fxo5qz

How to quickly download: click on “极速下载”, then click on “微信账号登录”, then take the photo of the QR code, send it to Sales@UOBDII.com, then you can quickly download it, about 5.5-5.8MB per second.


Language: English

OS: windows xp, win7 & win8


Compatible with brand new Xprog V6.12 (Firmware V4.4) :

free-download-xprog-v6.12-01 free-download-xprog-v6.12-02 free-download-xprog-v6.12-03

Source: http://www.uobdii.com/wholesale/latest-x-prog-m-with-usb-dongle.html


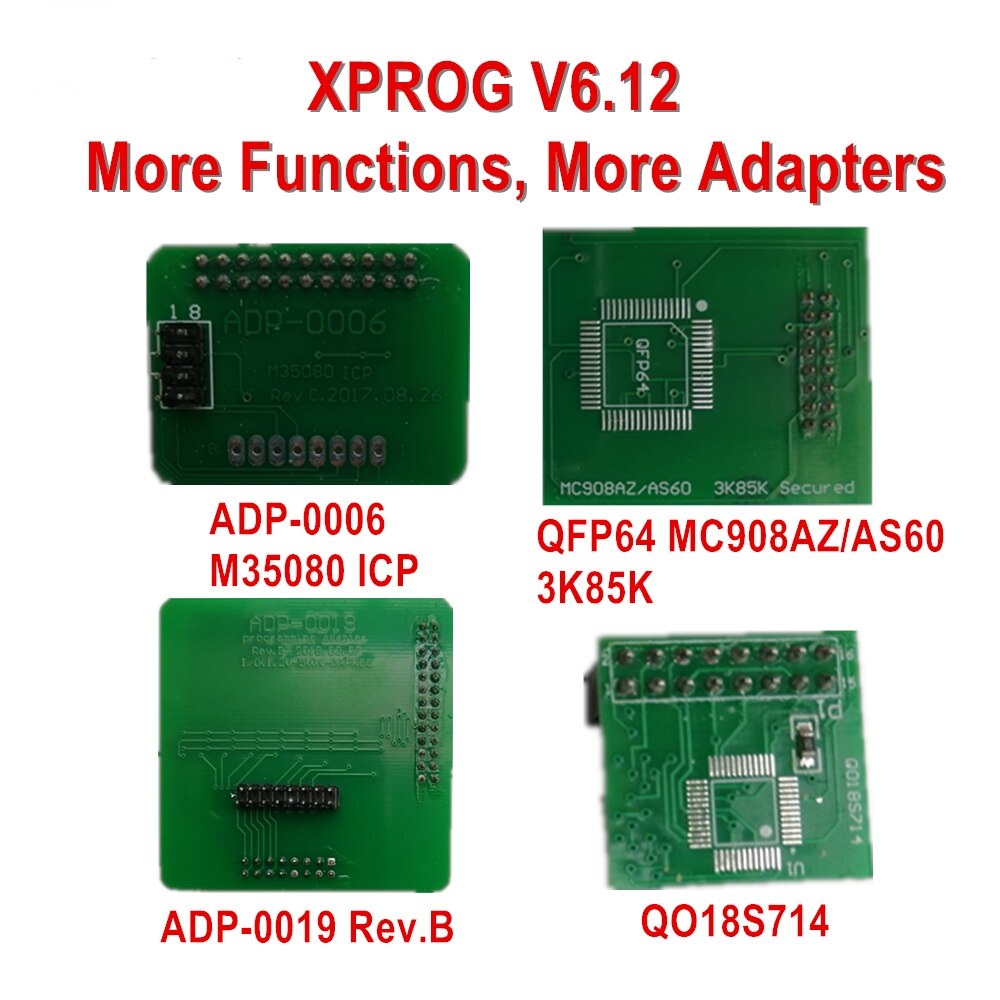
New Xprog V6.12 adds 2 new authorization & 4 new adapters:

AUTH-0028-3 Renesas RL78

AUTH-0028-4 Renesas M32C)

free-download-xprog-v6.12-04 free-download-xprog-v6.12-05


Xprog V6.12 software install on windows XP 7 8:

Dos & Don’ts:

  1. Not compatible with older version Xprog.
  2. Uninstall the older version Xprogbefore installing Xprog V6.12software.
  3. Uninstall all anti-virus software in your computer.
  4. No internet connection.
  5. Not support update.


Xprog V6.12 connection:

free-download-xprog-v6.12-06


Here Xprog V6.12 full chip list:

EEPROM

    Atmel

AT24C01A

AT24C02

AT24C04

AT24C08

AT24C16

AT24C32

AT24C32A

AT24C64

AT24C64A

AT25010

AT25020

AT25040

AT25080

AT25160

AT25320

AT25640

AT25128

AT25256

AT93C46

AT93C46A

AT93C56

AT93C56A

AT93C57

AT93C66

AT93C66A


  Catalyst

CAT24(W)C01

CAT24(W)C02

CAT24(W)C04

CAT24(W)CO8

CAT24(W)C16

CAT24(W)C32

CAT24(W)C64

CAT93C46

CAT93C46A

CAT93C56

CAT93C56A

CAT93C57

CAT93C66

CAT93C66A

CAT93C86

CAT93C86A


 FAIRCHILD

FM93C46

FM93CS46

FM93C56

FM93C66

FM93C86A

    Microchip

24xx00

24xx01

24xx014

24xx02

24xx04

24xx08

24xx16

24xx32

24xx64

24xx128

24xx256

24xx320

93xx46A

93xx46B

93xx46C

93xx56A

93xx56B

93xx56C

93xx66A

93xx66B

93xx66C

93xx76A

93xx76B

93xx76C

93xx86A

93xx86B

93xx86C

Mitsubishi

M6M80011

M6M80021

M6M80041

National

NM24C02

NM24C03

NM24C04

NM24C05

NM24C08

NM24C09

NM24C16

NM24C17

NM93C06/L/LZ

NM93C46/L/LZ

NM93CS46/L/LZ

NM93C46A/AL

NM93C56/L/LZ

NM93C56A

NM93CS56/L/LZ

NM93C66/L/LZ

NM93C66A

NM93CS66/L/LZ

NM93C86A/AL

ST

ST24/25xx01

ST24/25xx02

ST24/25xx04

ST24/25xx08

ST24/25xx16

M24C32

ST24/25E32

M24C64

ST24/25E64

ST24/25E256

M35080

M35160

M93C06

M93C46

M93C56

M93C66

M93C76

M93C86

M95010

M95020

M95040

M95080

M95160

M95320

M95640

M95128

M95256

M95512

ST93C06

ST93C46A/47

ST93CS46/47

ST93C56/57

ST93CS56/57

ST93C66/67

ST93CS66/67

ST95P02

ST95P04

ST95P08


  Toshiba

TC89101

TC89102

Xicor

X24(C)02

X24(C)04

X24(C)08

X24(C)16

X24164

X24(C)44


MCU/MPU

Atmel

ATmega8

ATmega16


ATmega32

ATmega64

ATmega128

Infineon(XC16x)

SA-KXC164C9-16F

SA-KXC164CS-32F

Infineon(XC20xx)

SAH-XC2060M-104 flash0

SAH-XC2060M-104 flash1

SAH-XC2060M-104 flash2

SAH-XC2060M-104 flash3

SAK-XC2060N-40 flash0

SAK-XC2060N-40 flash1


    Infineon(XC22xx)

SAH-XC226xN-16 flash0

SAH-XC226xN-16 flash1

SAH-XC226xN-24 flash0

SAH-XC226xN-24 flash1

5AH-XC226xN-40 flash0

SAH-XC226xN-40 flash1


    Infineon(XC23xx)

SAH-XC23364-72 flashO

SAH-XC23364-72 flash1

SAH-XC23364-72 flash3

SAK-XC2336B-24 fla.h0

SAK-XC2336B-24 flash1

SAK-XC2336B-40 flash0

SAK-XC2336B-40 flash1

SAK-XC236xA-56 flashO

SAH-XC236xA-56 flash1

SAH-XC236xA-56 flash3

SAH-XC236xA-72 flash0

SAH-XC236xA.72 flash1

SAH-XC236xA-72 flash3

SAH-XC236xA-104 fashO

SAH-XC236xA.104 fash1

SAH-XC236xA-104 flash2

SAH-XC236xA-104 flash3

SAH-XC236xB-24 flashO

SAH-XC236xB-24 fash1

SAH-XC236xB-40 flashO

SAH-XC236xB-40 flash1


    neon(XC27xx)

SAH-XC27x7X flash0

SAH-XC27x7X flash1

SAH-XC27x7X flash2

SAH-XC27x7X flash3

SAH-XC27x7X flash4

SAH-XC27x7X flash5

SAH-XC27x7X flash6


    Freescale/NXP(MAC7xxx)

MAC7111VAG50 Flash

MAC7111VAG50_ Data_ Flash

MAC71 12VAG50_ Flash

MAC7112VAG50_ Data _Flash

MAC7116VAG50_ Flash

MAC7116VAG50_ Data _Flash

MAC7131MVF_ Flash

MAC7131MVF_ Data_ FIash

MAC7241VAF64_ Flash

MAC7241VAF64_ Shadow_ Block

MAC7242VAF64_ Flash

MAC7242VAF64_Shadow_Block

    Microchip

PIC12C509A


    Micronas

CDC3217G

CDC3272G

CDC3297G

CDC32xxG> 24C32


    Micronas-secured

CDC3217G-secured

CDC3272G-secured

CDC3297G-secured

CDC32xxG-secured>24C32


Freescale/NXP HCO5

MC68HC05B4/B6/B8/B16/B32

MC68HC705B16[0D28J]

MC68HC705B16N

MC68HC705B32

MC68HC705B32(3G96A)

MC68HC05X32(0D53J)

MC68HC05X32(0D62J)

MC68HC05X32(0D69J;1H52A)

MC68HC05X32[1D69J]

MC68HC705X32(2D59J)

MC68HC05K3(S105078003)

NC68HC05E6(0F82B)

MC68HC05E6(0G72G)

MC68HC05H12[0H57A]

MC68HC05P3(1E25B)

MC68HC705P3(1F75B)

MC68HC05V12(1H24M)


Freescale/NXP HCO8

XC68HC708AZ60(8H62A)

MC68HC084S32(1J27F)

MC68HC08AZ32

MC68HC08AZ32(0J66D)

MC68HC908AZ32(0L72A)

MC68HC08AZ32A(1L52H)

MC68HC08AZ32A(2L52H]

MC68HC08AS60

MC68HC08AS60[8H62A)

MC68HC908AS60(3J74Y)

MC68HC08AZ60

MC68HC08AZ60(2J74Y)

MC68HC08AZ60[1J35D)

MC68HC08AZ60A

MC68HC08AZ604(1L87J)

MC68HC9084Z604[3K85K]


  Freescale/NXP HCO8-Updated

MC68HCx08AS/AZ32 CONFIG

MC68HCx08AS/AZ60 CONFIG

MC68HCx08AS/AZ32A CONFIG

MC68HCx08AS/AZ60A CONFIG

MC68HCx08AS/AZxxx EEPROM1+security

MC68HCx08AS/AZxxx EEPROM2+security

MC68HCx08AS/AZxxA EEPROM2+security

MC68HC908AS32A_ FLASH+security

MC68HC908AS32A_FLASH+secuity

MC68HC908AS60_ FLASH+security

MC68HC908AS60A_ FLASH+security

MC68HC908AZ60_FLASH+security

MC68HC9084Z60A FLASH+security

MC68HC908GR4_ FLASH+secuity

MC68HC908GR8_ FLASH+secuity

MC68HC908GR16 FLASH+security

MC68HC908LJ12 FLASH+security

MC68HC908L J24_ FLASH+security

MC68HC908LK24_ FLASH+secunty


    Freescale/NXP 9S08

MC9S08AC/AW8(A) FLASH

MC9S08AC/AW16(A) FLASH

MC9S08AW32_ FL ASH

MC9S08AW48_ FLASH

MC9S08AW60_ FLASH

MC9S08DZ16_ EEPROM

MC9S08DZ16_ FLASH

MC9S08DZ32_ EEPROM

MC9S08DZ32_ FLASH

MC9S08DZ48_ EEPROM

MC9S08DZ48_ FLASH

MC9S08DZ60_ EEPROM

MC9S08DZ60_ FLASH-I

MC9S08DZ60_ FL4SH-II

MC9S08DZ96_ EEPROM

MC9S08DZ96_ FLASH

MC9S08DV96_ FLASH

MC9S08DZ128_ EEPROM

MC9S08DZ128 FLASH

MC9S08DV128 FLASH

MC9S08EL 16 EEPROM

MC9S08EL 16 FLASH

MC9S08EL 32 EEPROM

MC9S08EL 32 FLASH

MC9S08FL8 FLASH

MC9S08FL 16 FLASH

MC9S08JM8_ FLASH

MC9S08JM16_ FLASH

MC9S08JM32_ FLASH

MC9S08JM60_ FLASH

MC9S08SG4 FLASH

MC9S08SG8 FLASH

MC9S08SG16 FLASH

MC9S08SG32 FLASH

MC9S08SH4 FLASH

MC9S08SH8 FLASH

MC9S08SH16 FLASH

MC9S08SH32 FLASH

MC9S08SL 8 EEPROM

MC9S08SL 8 FLASH

MC9S08SL 16 EEPROM

MC9S08SL 16 FLASH


    Freescale/NXP HC11

MC68HC11A1[C11W]

MC68HC11A8-old

MC68HC11A8-new

MC68HC11A8[AB95T)

MC68HC11E1

MC68HC11E9(4E28B)

MC68HC11E9(W/Secunty 0F36W)

MC68HC11EA9

MC68HC11EA9(0D46J)

MC68HC11EA9[1D47J]

MC68HC11EA9[2D47J)

MC68HC11F1(2F37E]

MC68HC11F1E87J]

MC68HC11K4

MC68HC11K4(0E75J]

MC68HC11K4(1E62H]

MC68HC11K4[3E74J)

MC68HC11KA4

MC68HC11KA4(0E57S)

MC68HC11KS2(1E59B)

MC68HC11KS2(0H95B]

MC68HC11KW1

MC68HC11L6

MC68HC11P2(3E74J)

MC68HC11P2(1E53M]

MC68HC11P2(0G10V]

MC68HC11PA8

MC68HC11PH8

MC68HC11PH8[3D64J]

MC68HC11PH8(0H30R)


   Freescale/NXP HC(S)12

MC68HC12BL16 EEPROM

MC68HC1 2B32 EEPROM

MC68HC912BD32 EEPROM

MC68HC912BD32_ FLASH

MC68HC912D60_ EEPROM

MC68HC912D60_ FLASH

MC68HC912D60A_ EEPROM

MC68HC912D60A_ FLASH

MC68HC912Dx128_ EEPROM

MC68HC912Dx128_ FLASH

MC68HC912Dx128A _EEPROM

MC68HC912Dx128A_FLASH

MC9S12C16-FLASH

MC9S12C32-FLASH

MC9S12C64-FLASH

MC9S12C96-FLASH

MC9S12C128-FLASH

MC9S12_ EEPROM

MC9S12_ FLASH

MC68HC912BD32-EEPROM-secured

MC68HC912BD32-FLASH-secured

MC68HC912D60-EEPROM-secured

MC68HC912D60-FLASH-secured

MC68HC912D60A-EEPROM-ecured

MC68HC912D60A-FLASH-secured

MC68HC912Dx128-EEPROM-secured

MC68HC912Dx128-FLASH-secured

MC68HC91 Dx128A-EEPROM-secured

MC68HC912Dx128A-FLASH-secured

MC9S12C64-FLASH-ecured

MC9S12T64-FLASH

MC9S12-EEPROM-secured

MC9S12-FLASH-secured


Freescale/NXP 9S12G

MC9S12G(A/N)NVM

MC9S12G(A/N)16 EEPROM

MC9S12G(A/N)16_ P-FLASH

MC9S12G(A/N)32_ EEPROM

MC9S12G(A/N)32_ P-FLASH

MC9S1 2G(A/N)48_ EEPROM

MC9S12G[A/N)48_ P-FLASH

MC9S1 2G(A)64_ EEPROM

MC9S1 2G[A)64_ P-FLASH

MC9S1 2G[A)96_ EEPROM

MC9S12G(A)96_ P-FLASH

MC9S12G(A)128 EEPROM

MC9S12G(A)128 P-FLASH

MC9S12G(A)192 EEPROM

MC9S12G(A)192 _P-FLASH

MC9S12G(A)240_ EEPROM

MC9S12G(A)240_PFLASH


Freescale/NXP 9S12HA/HY/P

MC9S12HA32/48/64 D-FLASH

MC9S12HY32/48/64_ D-FLASH

MC9S12P32/64/96/128 D-FLASH

MC9S12HY/HA32_ P-FLASH

MC9S12HY/HA48_ P-FL4SH

MC9S12HY/HA64_ P-FLASH

MC9S12P32_ P-FLASH

MC9S12P64_ P-FLASH

MC9S12P96_ P-FLASH

MC9S12P128_ P-FLASH

Freescale/NXP 9S12HZ


MC9S12HZ128/256 EEPROM

MC9S12HZ128 FLASH

MC9S12HZ256 FLASH


Freescale/NXP 9S12VR

MC9S12VR NVM

MC9S12VR16 FLASH

MC9S12VR32 FLASH

MC9S12VR48 FLASH

MC9S12VR64 FLASH

MC9S12VR16 EEPROM

MC9S12VR32 EEPROM

MC9S12VR48 EEPROM

MC9S12VR64 EEPROM


Freescale/NXP 9S12XD

MC9S12XDx128 EEPROM

MC9S12XDx128_ FLASH

MC9S12XD256_ EEPROM

MC9S12XD256_ FLASH

MC9S12XDT384_ EEPROM

MC9S12XDT384_ FLASH

MC9S1 2XDP512_ EEPROM

MC9S12XDP512_ FLASH

MC9S12XDx128-EEPROM-secured

MC9S12XDx128-FLASH-secured

MC9S12XD256-EEPROM-secured

MC9S12XD256-FLASH-secured

MC9S12XDT384-EEPROM-ecured

MC9S12XDT384-FLASH-secured

MC9S12XDP512-EEROM-secured

MC9S12XDP512-FLASH-secured


Freescale/NXP 9S12XE


MC9S12XEG128 EEE

MC9S12XEG128_ D-FLASH

MC9S12XEG128_ P-FLASH

MC9S12XET256_ EEE

MC9S12XET256_ D-FLASH

MC9S12XET256_ P-FLASH

MC9S12XEQ384_ EEE

MC9S12XEQ384_ D-FLASH

MC9S12XEQ384_ P-FLASH

MC9S12XEQ/XET512 _EEE

MC9S12XEQ/XET512_ _D-FLASH

MC9S12XEQ/XET512 P-FLASH

MC9S12XEP768_ EEE

MC9S12XEP768_ D-FLASH

MC9S12XEP768_ P-FLASH

MC9S12XEP100 EEE

MC9S12XEP100_ D-FLASH

MC9S12XEP100_ P-FLASH

MC9S12XEG128_ EEE-Secured

MC9S12XEG128_ D-FLASH-Secured

MC9S12XEG128_ P-FLASH-Secured

MC9S12XET256_ EEE Secured

MC9S12XET256_ D-FLASH-Secured

MC9S12XET256_ P-FLASH-Secured

MC9S12XEQ384_ EEE Secured

MC9S12XEQ384_ D-FLASH-Secured

MC9S12XEQ384 P-FLASH-Secured

MC9S12XEQ/XET512_ EEE Secured

MC9S12XEQ/XET512_ D-FLASH-Secured

MC9S12XEQ/XET512_P-FLASH-Secured

MC9S12XEP768_ EEE-Secured

MC9S12XEP768 D-FLASH-Secured

MC9S12XEP768 P-FLASH-Secured

MC9S12XEP100 EEE-Secured

MC9S12XEP100 D-FLASH-Secured

MC9S12XEP100 P-FLASH-Secured


Freescale/NXP 9S12XF

MC9S12XF EEPROM+securty

MC9S12XF EEPROM from D_ FLASH+secuity

MC9S12XF D-FLASH+secunty

MC9S12XF128_ P-FLASH+security

MC9S12XF256_ P-FLASH+security

MC9S12XF384_ P-FLASH+secunity

MC9S12XF512 P-FLASH+security


Freescale/NXP 9S12XHY

MC9S12XHY128 D-FLASH

MC9S12XHY128_ P-FLASH

MC9S12XHY256_ D-FLASH

MC9S12XHY256_ P-FLASH


Freescale/NXP 9S12XHZ

MC9S12XHZ256 EEPROM

MC9S12XHZ256_ FLASH

MC9S12XHZ384_ EEPROM

MC9S12XHZ384_ FLASH

MC9S12XHZ512 EEPROM

MC9S12XHZ512_ FLASH


Freescale/NXP 9S12XS

MC9S12XS64 D-FLASH

MC9S12XS64_ P-FLASH

MC9S12XS128_ D-FLASH

MC9S12XS128_ P-FLASH

MC9S12XS256 D-FLASH

MC9S12XS256_ P-FLASH

MC9S12XS128 D-FLASH-Secured

MC9S12XS128_ P-FLASH-Secured

MC9S12XS256 D-FLASH-Secured

MC9S12XS256_ P-FLASH-Secured


Freescale/NXP MPC5xx

MPC

MPC->Configuration-A

MPC->Configuration-B

MPC->External FLASH

MPC->External EEPROM M95xxx


Freescale/NXP MPC55xx

MPC5515 CODE Flash

MPC5516_ CODE_ Flash

MPC5517_ CODE_ Flash

MPC5554_ CODE_ Flash

MPC5565_ CODE_ Flash

MPC5566_ CODE_ Flash

MPC551x_ Shadow

MPC5554_ Shadow


Freescale/NXP MPC560x

MPC560xB/C/P DATA Fash

MPC560x5_ DATA-Flash

MPC5602B_ CODE Flash

MPC5603B_ CODE_ FIash

MPC5604B_ CODE_ Flash

MPC5605B_ CODE_ FIash

MPC5606B_ CODE_ FIash

MPC5607B_ CODE_ Flash

MPC5602C_ CODE_ FIash

MPC5603C_ CODE_ Flash

MPC5604C_ CODE _Flash

MPC5604P CODE Flash

MPC5602S CODE Flash

MPC5604S CODE Flsh

MPC5606S CODE Flash0

MPC5606S CODE Flash1

MPC560xB/C/P Code Flash Test

MPC5608B/C/P- Gode Flash Shadow

MP5S60B/CPTest Flash _lock

MPC560xS Code Flash Test

MPC5606S_ Code_ Flash_ Test1

MPC560xS_ Code_ Flash_ Shadow

MPC560xS_ Test_Flash_ Block


Freescale/NXP MPC563x

MPC/SPC5632M Flash0

MPC/SPC5632M Flash1

MPC/SPC5633M Flath0

MPC/SPC5633M Flash1

MPC/SPC5634M Flash0

MPC/SPC5634M Flash1

MPC/SPC5634M Flash2

MPC/SPC563xM Shadow

MPC/SPC563xM OTP0

MPC/SPC563xM OTP1

MPC/SPC563xM OTP2

Freescale/NXP MPC564x

MPC/SPC5642A-CODE  Flash

MPC/SPC5644A-CODE  Flash

MPC/SPC564XA-Shadow A

MPC/SPC5644A-Shadow B

National

CR16MCS9V

CR16MCS9V-KLine

Renesas M32C

M308xxx-data Flash

M30853FW Code Flash

M30853FH Code Flash

M30853FJ Code Flash

M30855FW Code Flash

M30855FH Code Flash

M30855F3 Code Flash

M30880FW Code Flash

M30880FH Code Flash

M30880FJ Code Flash

M30882FW Code Flash

M30882FH code flash

M30882FJ Code Flash

Renesas R32C

R5F6452X EEPROM

R5F6452X EEPROM ECC

R5F6452x Data Flash

R5F64524 Code Flash

R5F64525 Code Flash


Renesas RH850

R7F01A223-Data Flash

R7F01A223-Code Flash

R7F7010xx-Data Flash

R7F7014xx-Data _Flash

R7F7010xx-Code Flash-256kB

R7F7010xx-Code Fash-384kB

R7F7010xx-Code Flash-512B

R7F7010xx-Code Flash-768KB

R7F7010xx Code Flash-1024B

R7F7010xx-Code Flash-1536kB

R7F7010xx-Code Flash-2048kB

R7F7014xx-Code Flash-2048KB

R7F7014xx-Code Flash-3840kb

R7F7014xx-Code Flach-4096kb

R7F7014xx-Code Flash-5120kb

Renesas RL78/G13

R5F 100xxx Data Flash 4b

R5F 100xxx Data Flash 8kb

R5F 100/101XAx Code Flash 16kb

R5F100/10 1xCx Code Flash 32kb

R5F100/10 1xDx Code Flash 48kb

R5F100/101xEx_Code_Flash_64kb

R5F 100/101xFx_Code_Flash_96kb

R5F100/101xGx_Code_Flash_128kb

R5F100/101xhx_Code_Flash_192kb

R5F100/101×Jx_Code_Flash_256kb

R5F100/101xKx_Code_Flash_384kb

R5F100/101xLx_Code_Flash_512kb


Renesas SuperH

64F7055F

R4F70580S


Renesas V850-UART

uPD70F33xx Data Flash(UART)

uPD70F36xx Data Flash[UART)

uPD70F3344/54/64_ Code_ FIash(UART)

uPD70F3345/55/65_ Code_ FIash(UART)

uPD70F3346/56/66_ Code_ FIash(UART)

uPD70F3347/57/67_ Code_ FIash(UART)

uPD70F3348/58/68_ Code_ FIash(UART)

uPD70F3370_ Code_ Flash(UART)

uPD70F3371_ Code_ Flash(UART)

uPD70F3372_ Code_ Flash(UART)

uPD70F3373_ Code_ Flash(UART)

uPD70F3374_ Code_ Flash(UART)

uPD70F3375_ Code_ Flash(UART)

uPD70F3376_ Code_ Flash(UART)

uPD70F3377_ Code_ Flash(UART)

uPD70F3378_ Code_ Flash(UART)

uPD70F3379_ Code_ FIash(UART)

uPD70F3380_ Code_ Flash(UART)

uPD70F3381_ Code_ Flash(UART)

uPD70F3382_ Code_ FIash(UART)

uPD70F3383_ Code_ Flash(UART)

uPD70F3384_ Code_ FIash(UART)

uPD70F3385_ Code_ Flash(UART)

uPD70F3610_ Code_ FIash(UART)

uPD70F3611_ Code_Flash(UART)

uPD70F3612_ Code_ Flash(UART)

uPD70F3613_ Code_ Flash(UART)

uPD70F3614_ Code_ Flash(UART)

uPD70F3615_ Code_ FIash(UART)

uPD70F3616_ Code_FIash(UART)

uPD70F3617_ Code_ Flash(UART)

uPD70F3618_ Code_ FIash(UART)

uPD70F3619_ Code_ Flash(UART)

uPD70F3620_ Code_ FIash(UART)

uPD70F3621_ Code_ Flash(UART)

uPD70F3622_ Code_ Flash(UART)

uPD70F3623_ Code_ FIash(UART)

uPD70F3624 _Code_ Flash(UART)

uPD70F3625_ Code_ FIash(UART)

uPD70F3626_ Code_ Flash(UART)

uPD70F3627_ Code_ Flash(UART)

uPD70F3628_ Code_ FIash(UART)

uPD70F3629_ Code_ FIash(UART)

uPD70F3630_Code_ Flash(UART)

uPD70F3631_ Code_ FIash(UART)

uPD70F3632_ Code_ Flash(UART)

uPD70F3633_ Code_ Flash(UART)

uPD70F3634_ Code_ FIash(UART)

uPD70F3635_ Code_ FIash(UART)

uPD70F3636_ Code_ Flash(UART)

uPD70F3637_ Code_ Flash(UART)

uPD70F3638_ Code_ FIash(UART)


Renesas V850-SPI

uPD70F33xx Data Flash(SPI)

uPD70F346x_ Data Flash(SPI)

uPD70F347x_ Data_ FIash(SPI)

uPD70F36xx_ Data FIash(SPI)

uPD70F3231 Code_Flash(SPl)

uPD70F3344/54/64_ Code_ Flash(SPI)

uPD70F3345/55/65_ Code_ Flash(SPI)

uPD70F3346/56/66_ Code_ Flash(SPI)

uPD70F3347/57/67_ Code_ Flash(SPI)

uPD70F3348/58/68_ Code_ Flash(SPI)

uPD70F3370_Code_ Flash(SPI)

uPD70F3371_Code_ Flash(SPI)

uPD70F3372_Code_ Flash(SPI)

uPD70F3373_Code_ Flash(SPI)

uPD70F3374_Code_ Flash(SPI)

uPD70F3375_Code_ Flash(SPI)

uPD70F3376_Code_ Flash(SPI)

uPD70F3377_Code_ Flash(SPI)

uPD70F3378_Code_ Flash(SPI)

uPD70F3379_Code_ Flash(SPI)

uPD70F3380_Code_ Flash(SPI)

uPD70F3381_Code_ Flash(SPI)

uPD70F3382_Code_ Flash(SPI)

uPD70F3383_Code_ Flash(SPI)

uPD70F3384_Code_ Flash(SPI)

uPD70F3385_Code_ Flash(SPI)

uPD70F3464_Code_ Flash(SPI)

uPD70F3465_Code_ Flash(SPI)

uPD70F3466_Code_ Flash(SPI)

uPD70F3470_Code_ Flash(SPI)

uPD70F3471_Code_ Flash(SPI)

uPD70F3472_Code_ Flash(SPI)

uPD70F3610_Code_ Flash(SPI)

uPD70F3611_Code_ Flash(SPI)

uPD70F3612_Code_ Flash(SPI)

uPD70F3613_Code_ Flash(SPI)

uPD70F3614_Code_ Flash(SPI)

uPD70F3615_Code_ Flash(SPI)

uPD70F3616_Code_ Flash(SPI)

uPD70F3617_Code_ Flash(SPI)

uPD70F3618_Code_ Flash(SPI)

uPD70F3619_Code_ Flash(SPI)

uPD70F3620_Code_ Flash(SPI)

uPD70F3621_Code_ Flash(SPI)

uPD70F3622_Code_ Flash(SPI)

uPD70F3623_Code_ Flash(SPI)

uPD70F3624_Code_ Flash(SPI)

uPD70F3625_Code_ Flash(SPI)

uPD70F3626_Code_ Flash(SPI)

uPD70F3627_Code_ Flash(SPI)

uPD70F3628_Code_ Flash(SPI)

uPD70F3629_Code_ Flash(SPI)

uPD70F3630_Code_ Flash(SPI)

uPD70F3631_Code_ Flash(SPI)

uPD70F3632_Code_ Flash(SPI)

uPD70F3633_Code_ Flash(SPI)

uPD70F3634_Code_ Flash(SPI)

uPD70F3635_Code_ Flash(SPI)

uPD70F3636_Code_ Flash(SPI)

uPD70F3637_Code_ Flash(SPI)

uPD70F3638_Code_ Flash(SPI)

uPD70F3639_Code_ Flash(SPI)


Renesas V850E2-FLURORTX

uPD70F3548/49/50 Data Flash

uPD70F3551/52/53_ Data Flash

uPD70F3554_ Data Flash

uPD70F3555/56_ Data Flash

uPD70F3557/58_ Data Flash

uPD70F3559/60_ Data Flash

uPD70F3570/71/72_ Data Flash

uPD70F3573/74/75_ Data Flash

uPD70F3576/77/78/79/80_ Data FIash

uPD70F3582/83/84/85_ Data _Flash

uPD70F 4000/01/02 Data_ Flash

uPD70F 4003/04/05 Data_ Flash

uPD70F4006_ Data Flash

uPD70F4007/08_ Data Flash

uPD70F4009/10_ Data Flash

uPD70F4011/12_ Data Flash

uPD70F3548_ Code_ Flash

uPD70F3549_ Code_ Flash

uPD70F3550_ Code_ Flash

uPD70F3551_ Code_ Flash

uPD70F3552_ Code_ Flash

uPD70F3553_ Code_ Flash

uPD70F3554_ Code_ Flash

uPD70F3555_ Code_ Flash

uPD70F3556_ Code_ Flash

uPD70F3557_ Code_ Flash

uPD70F3558_ Code_ Flash

uPD70F3559_ Code_ Flash

uPD70F3560_ Code_ Flash

uPD70F3570_ Code_ Flash

uPD70F3571_ Code_ Flash

uPD70F3572_ Code_ Flash

uPD70F3573_ Code_ Flash

uPD70F3574_ Code_ Flash

uPD70F3575_ Code_ Flash

uPD70F3576_ Code_ Flash

uPD70F3577_ Code_ Flash

uPD70F3578_ Code_ Flash

uPD70F3579_ Code_ Flash

uPD70F3580_ Code_ Flash

uPD70F3581_ Code_ Flash

uPD70F3582_ Code_ Flash

uPD70F3583_ Code_ Flash

uPD70F3584_ Code_ Flash

uPD70F3585_ Code_ Flash

uPD70F4000_ Code_ Flash

uPD70F4001_ Code_ Flash

uPD70F4002_ Code_ Flash

uPD70F4003_ Code_ Flash

uPD70F4004_ Code_ Flash

uPD70F4005_ Code_ Flash

uPD70F4006_ Code_ Flash

uPD70F4007_ Code_ Flash

uPD70F4008_ Code_ Flash

uPD70F4009_ Code_ Flash

uPD70F4010_ Code_ Flash

uPD70F4011_ Code_ Flash

uPD70F4012_ Code_ Flash


SPC560/SPC56A

SPC560B40Lx_ DATA flash

SPC560B50Lx_ DATA flash

SPC560B54Lx_ DATA flash

SPC560B60Lx_ DATA flash

SPC560B64Lx_ DATA flash

SPC560C40Lx_ DATA flash

SPC560C50Lx_ DATA flash

SPC560P44Lx_ DATA flash

SPC560P50Lx_ DATA flash

SPC564P54Lx_ DATA flash

SPC564P60Lx_ DATA flash

SPC560B40Lx_ CODE_ flash

SPC560B50Lx_ CODE_ flash

SPC560B54Lx_ CODE_ flash

SPC560B60Lx_ CODE_ flash

SPC560B64Lx_ CODE_ flash

SPC560C40Lx_ CODE_ flash

SPC560C50Lx_ CODE_ flash

SPC560P44Lx_ CODE_ flash

SPC560P50Lx_ CODE_ flash

SPC560AP54Lx_ CODE_ flash

SPC560AP60Lx_ CODE_ flash

SPC560Bxx_ code_ flash test

SPC560Bxx_ code_ flash_ shadow

SPC560Bxx_ test flash. _block

SPC560Cxx_ code_ flash test

SPC560Cxx_ code_ flash _shadow

SPC560Cxx_ test flash_ block


SPC564

SPC564A70_ code_ flash

SPC564A80_ code_ flash

SPC564Axx_ Shadow A

SPC564A80_ Shadow B


ST7

ST72321(R/AR)6

ST72F321(R/AR)6

ST72321(R/AR/J)7

ST72F321(R/AR/J)7

ST72321(R/AR/J)9

ST72F321(R/AR/J)9

ST72521B(R/AR)6

ST72F521(R/AR)6

ST72521B(M/R/AR)9

ST72F521(M/R/AR)9


ST10

ST10F168

ST10F168> ST24C64

ST10F269

ST10F272

ST10F275

ST10F276

ST10F280


TEXAS Instruments

TMS370C002A

TMS370C010A

TMS370C012A

TMS370C020A

TMS370C022A

TMS370C032A

TMS370C040A

TMS370C042A

TMS370C050A

TMS370C052A

TMS370C056A

TMS370C058A

TMS370C256A

TMS374C003APQQ

TMS374CD13APQQ


ZGS 001

A 164 540 56 62

MC9S12DT256>EEPROM

MC9S12DT256-FLASH

MC9S12DT256- External FLASH(Am29F400BT)


A 169 540 69 45

MC9S12DT256>EEPROM

MC9S12DT256-FLASH

MC9S12DT256- External FLASH(Am29F800BT)


A 220 445 19 00

MC9S12DT256>EEPROM

MC9S12DT256-FLASH

MC9S12DT256- External FLASH(Am29F800BT)


A 211 445 25 00

MC9S12DT256>EEPROM

MC9S12DT256-FLASH

MC9S12DT256- External FLASH(Am29F800BT)


A 211 540 25 45

SC68HC912DG128A->EEPROM

SC68HC912DG128A->FLASH

SC68HC912DG128A->Extemal FLASH[29F400TC]


A 211 540 29 45

SC68HC912DG128A->EEPROM

SC68HC912DG128A->FLASH

SC68HC912DG128A->Extemal FLASH[Am29F400BT]


A 211 540 35 45

MC9S12DT256->EEPROM

MC9S12DT256->FLASH

MC9S12DT256- >External FLaSH[Am29F800BT)


TV

BMW

E60 E63 E64


Other ECU

Audi

BCM2_ uPD70F3381 Code Flash

BCM2_ uPD70F381_ Data_ Flash


BMW

FRM EEE

FRM_ P-FLASH


Chevrolet

AVEO ECM ECU Code Flsh


Chrysler-Dodge-Jeep

BCM.GRAND CHEROKEE WK 2014 Fash

BCM-GRAND CHEROKEE _WK_ 2014 _Shadow

Chrysler TIPM_ Flash

Chrysler TIPM_ Data Flash

NCG3-MPC565

NCG3-MPC565-Configuration-A

NCG3-MPC565->Configuration-B

NCG3-MPC565-M95080

NCG4-MPC5554_ Code_ Flash

NCG4-MPC5554_ Shadow

NCG4-MPC554-ST95320


Citroen

ECU_ SAK-XC164CS-32F

ECU_ XC164CS-32F->24C16


FORD

FORD BCM CODE Flash

FORD_ BCM DATA Flash


GM ECU

SAF-XC164CS-16F


HONDA Bikes

CB650F 2015 Code Flash

CB650F 2015_ Data Flash


Renault Clio III

EPS ST10F269

EPS_ ST10F269- 24C16

EPS_ XC164CS-32F

EPS_ XC164CS-32F- 24C16


SUBARU

TCM 2009 64F7055F


TRIUMPH

Chassis_ Control Unit Flash0

Chassis_ Control Unit Flash1

Chassis_ Control Unit Flash2


VW

VW GearBox R4F70580S


XP8000E_ XET256

XP8000E XET256 EEE

XP8000E XET256_ P-FLASH


VOLVO

VOLVO_ CCM Flash

VOLVO_ ECU_ 64F7055

VOLVO_ ECU_ R4F70580


Where to have Xprog V6.12?

http://www.uobdii.com/wholesale/latest-x-prog-m-with-usb-dongle.html


Mercedes W205 engine online coding with vxdiag C6 C5 C4

$
0
0

How to do Mercedes W205 engine online coding with vxdiag Benz C6 DOIP/ sdconnect C5 / C4.

Communication with control unit ‘N3/10 -Motor electronics ‘MED40’ for combustion engine ‘M274′(ME)’ is being established.

mercedes-w205-engine-online-coding-with-vxdiag-c4-01 mercedes-w205-engine-online-coding-with-vxdiag-c4-02 mercedes-w205-engine-online-coding-with-vxdiag-c4-03

Version information.

mercedes-w205-engine-online-coding-with-vxdiag-c4-04

Error codes.

mercedes-w205-engine-online-coding-with-vxdiag-c4-05

Actual values.

mercedes-w205-engine-online-coding-with-vxdiag-c4-06

Actuations.

mercedes-w205-engine-online-coding-with-vxdiag-c4-07

Adaptations.

mercedes-w205-engine-online-coding-with-vxdiag-c4-08


Updating of SCN coding-> an online connection is okay.

Determination of user authorization.

Message from central system.

Vehicle data are being requested from headquarters, please wait.

mercedes-w205-engine-online-coding-with-vxdiag-c4-09


Coding of control unit “Motor electronics ‘MED40’ for combustion engine ‘M274’.

mercedes-w205-engine-online-coding-with-vxdiag-c4-10 mercedes-w205-engine-online-coding-with-vxdiag-c4-11 mercedes-w205-engine-online-coding-with-vxdiag-c4-12 mercedes-w205-engine-online-coding-with-vxdiag-c4-13 mercedes-w205-engine-online-coding-with-vxdiag-c4-14


The SCN coding sequence has been completed successfully.

mercedes-w205-engine-online-coding-with-vxdiag-c4-15 mercedes-w205-engine-online-coding-with-vxdiag-c4-16


Enjoy!

www.uobdii.com

How to active DTS Monaco 8.13 for sdconnect c4?

$
0
0

Question: Got V2019.12 sdconnect C4 Dell 500G, found only DTS Monaco 8.13, no DTS Monaco 8.03. And how to active DTS Monaco 8.13?


uobdii.com engineer replied:

Actually, it contains both, Monaco 8.03 is not put on the desktop.

dts-01


The procedure to active DTS Monaco 8.13:

  1. Please run DTS 8.13 and it will pop up the hardware ID, copy it and send it to the customer service (Or you can use the Teamviewer for remote assistance).


  1. The dealer will give you an activating file, you can put it into the software category.


After that, you can use DTS Monaco 8.13 for coding / programming / retrofit HU5 Hu6 Hu7 etc.


PS:

Only after connecting with sdconnect C4 plus, can Monaco & Vediamo software be used normally.

sdconnect-c4-02

Good luck!

Volvo S80 2011 add key ok with Lonsdor K518S key programmer

$
0
0

Key programmer: Lonsdor K518S key programmer

Car: Volvo S80 2011 akl read CEM with adapter and add key ok.

what adaptor to use: For cem reading you have on this Black small bag with lonsdor

Volvo-S80-2011-add-key-ok-with-Lonsdor-K518S


Procedure on how does Lonsdor K518ISE program key for Volvo S80

http://lonsdor-k518.blogspot.com/2017/10/lonsdor-k518ise-program-key-for-volvo.html


Lonsdor K518S is the best Volvo key programmer, look at all Volvo car models it covers:

VOLVO\S60\2010-2018\Smart key[insert start]: Add key, Lost all key, Read CEM security data, Key recognition & unlocking,


VOLVO\S60\2010-2018\Keyless-go[button start]: Add smart key, Delete smart key, Read CEM security data, Read KVM security data, Key recognition & unlocking, Module identification,


VOLVO\S80\2009-2016\Keyless-go[button start]: Add smart key, Delete smart key, Read CEM security data, Read KVM security data, Key recognition & unlocking, Module identification,


VOLVO\XC60\2009-2018\Keyless-go[button start]: Add smart key, Delete smart key, Read CEM security data, Read KVM security data, Key recognition & unlocking, Module identification,


VOLVO\S80\2009-2016\Smart key[insert start]: Add key, Lost all key, Read CEM security data,Key recognition & unlocking,


VOLVO\XC60\2009-2018\Smart key[insert start]: Add key, Lost all key, Read CEM security data,Key recognition & unlocking,


VOLVO\S40\2004-2012\Smart key: Add smart key, Delete smart key, Unlock key,


VOLVO\S40\2004-2012\Immobilizer: Add key, Delete key, Identify key ID, Unlock key,


VOLVO\S80\2007-2009\Smart key[insert start]: Add key, Delete key, Read CEM security data, Key recognition & unlocking,


VOLVO\V40\2012-2018\Smart key[insert start]: Add key, Delete key, Read CEM security data, Key recognition & unlocking,


VOLVO\C30\2007-2013\Immobilizer: Add key, Delete key, Identify key ID, Unlock key,


VOLVO\C30\2007-2013\Smart key: Add smart key, Delete smart key, Unlock key,


VOLVO\V40\2012-2018\Keyless-go[button start]: Add smart key, Delete smart key, Read CEM security data, Read KVM security data, Key recognition & unlocking, Module identification,


VOLVO\S80\2007-2009\Keyless-go[button start]: Add smart key, Delete smart key, Read CEM security data, Read KVM security data, Key recognition & unlocking, Module identification,


VOLVO\V60\2011-2017\Smart key[insert start]:   Add key, Lost all key, Read CEM security data, Key recognition & unlocking,


VOLVO\V60\2011-2017\Keyless-go[button start]: Add smart key, Delete smart key, Read CEM security data, Read KVM security data, Key recognition & unlocking, Module identification,


VOLVO\XC60\2006-2009\Smart key[insert start]: Add key, Delete key, Read CEM security data, Key recognition & unlocking,


VOLVO\XC60\2006-2009\Keyless-go[button start]: Add smart key, Delete smart key, Read CEM security data, Read KVM security data, Key recognition & unlocking, Module identification,


VOLVO\XC90\2005-\Flip key: Add key, Delete key, Identify key ID, Key unlock


VOLVO\S80\2005-2007\Flip key:    Add key, Delete key, Identify key ID, Key unlock,


VOLVO\C70\2007-2013\Immobilizer:    Add key, Delete key, Identify key ID, Unlock key,


VOLVO\C70\2007-2013\Smart key:         Add smart key, Delete smart key, Unlock key,


VOLVO\V70\2009-2016\Smart key[insert start]:   Add key, Lost all key, Read CEM security data, Key recognition & unlocking,


VOLVO\V70\2009-2016\Keyless-go[button start]: Add smart key, Delete smart key, Read CEM security data, Read KVM security data, Key recognition & unlocking, Module identification,


VOLVO\XC70\2010-2016\Smart key[insert start]: Add key, Lost all key, Read CEM security data, Key recognition & unlocking,


VOLVO\XC70\2010-2016\Keyless-go[button start]: Add smart key, Delete smart key, Read CEM security data, Read KVM security data, Key recognition & unlocking, Module identification,


VOLVO\XC70\2007-2010\Smart key[insert start]: Add key, Delete key, Read CEM security data, Key recognition & unlocking,

VOLVO\XC70\2007-2010\Keyless-go[button start]:       Add smart key, Delete smart key, Read CEM security data, Read KVM security data, Key recognition & unlocking, Module identification,


VOLVO\XC70\-2006\Flip key: Add key, Delete key, Identify key ID, Key unlock,


Enjoy!


www.uobdii.com

VVDI BMW Tool feedback + v1.5.0 free download link

$
0
0

Put together Xhorse vvdi bmw tool feedback in this article, please read them any you’ll find helpful.

1-3

@ huzionet feedback:

-> Support instrument cluster memory M35080 v6 – done

-> Key programming in 2004 E60 with CAS2 successful.

-> I was able to connect and code the test kit I built with cas3, kgm, kombi, ahl, where communication is via d-can cable. I was able to code two controllers and program the meter. In fact, before these activities, the program downloaded data from the internet. Today I tried to connect to E83 and failed, and should also code this car. We managed to change the mileage in CAS3 + through obd and change the mileage from read m35080v6 memory. For now, I have not tried to do more on the car.

-> I think that key programming is well done because vvdi2 has had CAS3 ++ keys for a long time.

@MIKUr1 feedback:

Got the vvdi bmw tool and for now I did two keys – one for E63 CAS2 and second for E87 CAS2. Both without problem, 3-4 minutes job, but actually, this is no big achievement .

In F15 it reads FA and coding properly, but can’t recode. Also, after loading dump from EWS3 it shows that mileage is 0km – of course not so big problem.

@lukasz_61 feedback

I’ve read ISN from MSD80 from 2008 E92 335i US. Not thru OBD port, but by doing little harness on bench like in diagram.

@chrisi1909 feedback

New Version 1.50 ready for downloading since yesterday ! A few changes.


@mircea13n feedback

i’ve talked to xhorse suport about sw bugs , sent logs to R&D team of xhorse with answer.

on F series i discovered that anytime i try to code a unit the sw crash. cas2 key add via obd tested succesfuly.


Here you can free download vvdi bmw tool v1.5.0:

https://mega.nz/#!sVtWVKAK!OfSaodozbcfjUYiEbwsLaK25QDnp-pal5rgPHswr33A

Which can fix the software bugs.

To be upgrading…


www.uobdii.com


How to Register & Upgrade obdstar x300 dp plus / odo master?

$
0
0

Device: obdstar x300 dp plus or odo master

Purpose: register a member and update

Guide:

Part 1: obdstar x300 dp plus registration and update procedure

Hold on the “ON” button for 3 seconds to turn on the machine.

obdstar-x300-dp-plus-registration-and-update-01 obdstar-x300-dp-plus-registration-and-update-02


1 Connect to your Wifi

Tap the “Setting” option.

Select “Wifi” connection

Connect the WIFI

Wifi connection succeed

obdstar-x300-dp-plus-registration-and-update-03 obdstar-x300-dp-plus-registration-and-update-04 obdstar-x300-dp-plus-registration-and-update-05


  1. Register a user account

Tap the “Update” option.

Select “Register”.

If the SN (serial number) and the registration password can’t display automatically, please check if the 12V power supply is connected.

obdstar-x300-dp-plus-registration-and-update-06 obdstar-x300-dp-plus-registration-and-update-07 obdstar-x300-dp-plus-registration-and-update-08


  1. Please connect 12v power supply.

Enter the registration menu.

Have SN number and the password.

Input the information and complete registration.

Enter the password to login.

obdstar-x300-dp-plus-registration-and-update-09 obdstar-x300-dp-plus-registration-and-update-10 obdstar-x300-dp-plus-registration-and-update-11

4.Update all car software

Have message” download the new app”.

Install the new APP.

Enter the software.

Select all software to update, then select “Bulk update”.

Wait until the software update complete (The update speed is up to the network connection speed).

obdstar-x300-dp-plus-registration-and-update-12 obdstar-x300-dp-plus-registration-and-update-13 obdstar-x300-dp-plus-registration-and-update-14 obdstar-x300-dp-plus-registration-and-update-15 obdstar-x300-dp-plus-registration-and-update-16 obdstar-x300-dp-plus-registration-and-update-17 obdstar-x300-dp-plus-registration-and-update-18 obdstar-x300-dp-plus-registration-and-update-19 obdstar-x300-dp-plus-registration-and-update-20 obdstar-x300-dp-plus-registration-and-update-21


FYI, if obdstar x300 dp plus one-year free update period expired, you can order the one-year update service:

http://www.uobdii.com/wholesale/obdstar-x300-dp-plus-one-year-update-service.html


Part 2: obdstar odo master registration and update procedure

Watch this video guide:

Generally speaking, the update procedure of obdstar odo master is as the same as that of obdstar X300 DP plus.


Enjoy!


www.uobdii.com

How to install VW ODIS 5.1.6 PostSetup 89.5.30 on win7 32bit?

$
0
0

ODIS 5.1.6 PostSetup 89.5.30 is tested working fine with any of these diagnostic interface: VAS 5054, VAS 5055, VAS 6154, VAS 6154A, PassThru etc. The following parts are about how to install ODIS 5.1.6 PostSetup 89.5.30 for VXDIAG VCX NANO 5054 on win7 32bit, and test it to diagnose VW 3 C – Passat 2006 USA /CAN 2007 successfully via both USB cable and WIFI network.


Procedure:

1.Copy all VW ODIS 5.1.6 software from the DVD to your disk D.

When you copy for the first time, it only display PostSetup.part1 to part08; you need to right click on DVD again and select “Eject”, then open DVD to copy PostSetup.part09 to part18;

One more time to select “Eject”, then open DVD to copy PostSetup.part19 to part28;

Last time to select “Eject”, then open DVD to copy PostSetup.part29 to part38;

odis-5-1-6-install-01 odis-5-1-6-install-02


2.Back to Disk (D:), right click on “PostSetup.part01”, then “Extract here”.

odis-5-1-6-install-03


3.Select all PostSetup.part01 to PostSetup.part38, delete them.

odis-5-1-6-install-03

4.Open “0.DTLite4454 -0314”.

The windows get message ” You must restart your computer to turn off user account control”, just restart the computer.

odis-5-1-6-install-05


Select one language;

All access;

I agree;

License type: free license;

Choose components (as default);

Next;

Next;

Next;

Soon, DTSOFT Virtual CdRom Device driver software is installed successfully.

odis-5-1-6-install-06


Click on “Don’t install” Desktop Gadgets;

Google Chrome is installation;

DAEMON Tools Lite has been installed on your computer.


Click on “Allow access” when you get message “Windows firewall has blocked some features of this program”.

Click on “Ask me later” for IE browser, and click on “Close all tabs”.


Right click on the blank space of Daemon Tools Lite, Add Images;

Select Computer -> Software (D:) -> ODIS 5.1.6-> PostSetup;

Right click on ” PostSetup.iso”, select “Mount”;

Close “AutoPlay”;

Close ” Daemon Tools Lite”.

odis-5-1-6-install-07 odis-5-1-6-install-08 odis-5-1-6-install-09


Open Software (D:) -> ODIS 5.1.6-> 1.Windows Update;

Right click on “My computer”, then “Properties”, what I use is win7 32bit;

So I choose Windows6.1-KB2921916-x86;

Windows software update successfully;

Back to open “Windows6.1-KB2992611-X86” to complete the update.

Back to open “Windows6.1-KB3033929-x86” to update.

Note: Please do not click on “Restart now”.

odis-5-1-6-install-10 odis-5-1-6-install-11


Open “2. OffboardDiagSetup – Service _VWMCD_5_1_6-B51_6_0_10”, please “Run as administrator”.

odis-5-1-6-install-12


Select Language.

odis-5-1-6-install-13


Next -> Next -> Next;

Diagnostic interface: VAS 5054, VAS 5055,VAS 6154A, PassThru;

odis-5-1-6-install-14


Next -> Next -> search “the license” (Open “3.Launcher +License + plugins 5.1.6”, copy “license.dat” and paste it on the desktop.) -> Next

odis-5-1-6-install-15 odis-5-1-6-install-16 odis-5-1-6-install-17


Next -> Next ->installing ODIS -> Microsoft Visual C++ 2005 Redistributable -> Install the driver software.

ODIS setup Assistant setup complete.

odis-5-1-6-install-18 odis-5-1-6-install-19


On the desktop, right click on “Offboard Diagnostic Information System”, select “Properties”;

Open file location;

Open Software (D:) -> ODIS 5.1.6-> “3.Launcher +License + plugins 5.1.6” ->Copy “OffboardDiagLauncher” and paste it to Local disk (C:) ODIS folder.

odis-5-1-6-install-20


In the same method, open Plugins and copy the file into the same plugins folder of Local disk (C:), and replace it.

odis-5-1-6-install-21


On the desktop, right click on “Offboard Diagnostic Information System”, select ” Run as administrator”.

Select Local driver (shown as below);

User name: abc; passsword: abc;

Next language: multi-lingual;

Next;

Diagnostic data update is available.

Next;

Restart computer.

odis-5-1-6-install-22 odis-5-1-6-install-23 odis-5-1-6-install-24


Open computer ->software (D:) -> ODIS 5.1.6 -> Patch -> Copy “Softing”;

Paste “Softing” into Computer ->Local Disk (C:) -> Program files;

odis-5-1-6-install-25 odis-5-1-6-install-26 odis-5-1-6-install-27 odis-5-1-6-install-28 odis-5-1-6-install-29


Open computer ->software (D:) -> ODIS 5.1.6 -> Copy “Drivers” and paste it on the desktop.

Open “Drivers” on the desktop, then “VX Manager 1.6.2.0902”.

odis-5-1-6-install-30 odis-5-1-6-install-31 odis-5-1-6-install-32


Select VAG -ODIS 6154.

odis-5-1-6-install-33

Next ;

Finish.


Computer – Manage -Device Manager- COM5, that is the driver is installed well.

odis-5-1-6-install-34


Open “Vx Manager”;

Click on “Firmware”, then “Upgrade”;

Exit Vx Manager.

odis-5-1-6-install-35 odis-5-1-6-install-36


On the desktop, open Offboard Diagnostic Information System;

Click on “Cancel”.

Read the warning /notes and click on “OK;

Click on “OBD”, then “Start self diagnosis”;

Select model: VW 3 C – Passat 2006 USA /CAN 2007.

ODIS 5.1.6 can access to all control systems;

DTCs are read out.

End odis.

odis-5-1-6-install-37 odis-5-1-6-install-38 odis-5-1-6-install-39 odis-5-1-6-install-40


Next is to Disconnect the USB and connect WIFI to test ODIS 5.1.6

You can see I connect to VAS 6154 network, then open Offboard Diagnostic Information System to do diagnosis successfully.

odis-5-1-6-install-41 odis-5-1-6-install-42 odis-5-1-6-install-43

That’s all!


www.uobdii.com

How to Set GM MDI2 Wifi Network Connection?

$
0
0

The article help how to set GM MDI2 Wifi successfully so that you can only only use with one USB cable.


Use the USB cable to connect GM MDI2 and the computer.

Wait until the GM MDI2 green indicator light on.

gm-mdi2-wifi-setting-01


On the computer, connect WIFI.

If succeed, you will be able to open the IE browser.

gm-mdi2-wifi-setting-02 gm-mdi2-wifi-setting-03


On the desktop, click on “GM MDI Manager”, then “Connect”.

gm-mdi2-wifi-setting-04


Click on “Network Setup” ->“Enable wireless interface” ->“Access Point”.

Click on “Refresh” to select from available network list.

gm-mdi2-wifi-setting-05 gm-mdi2-wifi-setting-06 gm-mdi2-wifi-setting-07


Double click on “TP-LINK_33F8”, enter the password.

gm-mdi2-wifi-setting-08


Click on “Yes”.

gm-mdi2-wifi-setting-09


MDI is configured to connect the following network.

gm-mdi2-wifi-setting-10


Click on “MDI Explorer”, then “Disconnect”.

gm-mdi2-wifi-setting-11


Unplug the USB cable from GM MDI2 Tool.

gm-mdi2-wifi-setting-12


Once again, click on MDI2 icon then “Connect”.

gm-mdi2-wifi-setting-13


GM MDI2 green indicator light on again.

gm-mdi2-wifi-setting-14

GM MDI2 Wifi is setting successfully.


User guide on CAS1 / 2 / 3 / 3+ / 3++ /4 /4+ / FEM / BDC

Tech2win v33.004 GDS2 v21.0.01501 setup for vxdiag nano

$
0
0

Hey guys, I will show you how to install Tech2win v33.004 GDS2 v21.0.01501 for vxdiag Nano GM / Opel diagnostic programming tool (both USB version & Wifi version) .


OS:

Tech2win: XP/win7/win8/win10 32bit and 64 bit

GDS2: win 7 64 bit, win 8 64 bit


Tech2win v33.004 capabilities:

Diagnostics, service programming system, view captured data, GM Performance parts diagnostics


GDS2 v21.0.01501 capabilities:

Module diagnostics

Vehicle diagnostics

System diagnostics

Online programming (need account)


Language:

Tech2win v33.004: English

GDS2 v21.0.01501: multi-lingual


Procedure:

1.Tech2Win

Open DVD;

Open tech2win folder and run [AutoInstall];

vxdiag-gds2-and-tis2web-install-01 vxdiag-gds2-and-tis2web-install-02


2.Install GM MDI software 8.3.103.26.

Next;

Next;

Install

Finish

vxdiag-gds2-and-tis2web-install-03 vxdiag-gds2-and-tis2web-install-04


3.Install Tech2Win;

Select ” Install this driver software anyway.

Tech2win Install OK.

vxdiag-gds2-and-tis2web-install-05 vxdiag-gds2-and-tis2web-install-06 vxdiag-gds2-and-tis2web-install-07


4.Open “GDS2AutoInstaller” folder and Run ” GDS2AutoInstall”.

Click on “Start” and wait for 20 minutes.

Installation is complete, click on “Close ” button.

vxdiag-gds2-and-tis2web-install-08 vxdiag-gds2-and-tis2web-install-09


5.Run VX Manager.

Tick “Passtru-J2534” and “GM-GDS/Tech2win”.

Next;

Complete the VX Manager setup Wizard.

vxdiag-gds2-and-tis2web-install-10 vxdiag-gds2-and-tis2web-install-11 vxdiag-gds2-and-tis2web-install-12 vxdiag-gds2-and-tis2web-install-13


6.Please plug vxdiag vcx nano interface to the 16pin cable of GM / Opel, and another end to a computer via the USB cable or wifi.

Then your device is ready to use.

Open the device manager to confirm whether the VXDIAG Nano VCX has a good communication with the computer: Computer -> Manage -> Device Manager -> USB Serial Port (COM4).

vxdiag-gds2-and-tis2web-install-14 vxdiag-gds2-and-tis2web-install-15 vxdiag-gds2-and-tis2web-install-16


7.Run VX Manager to view the Nano device version and authorization.

vxdiag-gds2-and-tis2web-install-17


8.Run Tech2win, select “North American”.

Select the manufacturer you want to use.

Select the interface you want to use.

System initializing.

Tech 2 Post ver 6.2

vxdiag-gds2-and-tis2web-install-18 vxdiag-gds2-and-tis2web-install-19 vxdiag-gds2-and-tis2web-install-20 vxdiag-gds2-and-tis2web-install-21


9.Launch Tech2 software v33.004. (Candi module attached).

Press “Enter” to continue.


Main menu: diagnostics, service programming system, view captured data, GM Performance parts diagnostics, Tool Options, Getting Started.

vxdiag-gds2-and-tis2web-install-22 vxdiag-gds2-and-tis2web-install-23


10.After selecting ” Diagnostics”, select 2013.

LD Trk, MPV, Incomplete;

GM truck – > V

Powertrain;

3+6.L V6 LLT.

Engine control module;

Diagnostic trouble codes (DTC);

DTC Display;

Establishing communications.

vxdiag-gds2-and-tis2web-install-24 vxdiag-gds2-and-tis2web-install-25 vxdiag-gds2-and-tis2web-install-26 vxdiag-gds2-and-tis2web-install-27 vxdiag-gds2-and-tis2web-install-28 vxdiag-gds2-and-tis2web-install-29 vxdiag-gds2-and-tis2web-install-30


Note: if the tech2win quickly exit automatically, please restart your computer, and again run  Tech2win to repeat the above steps.  (Or please reinstall tech2win, and open tech2win then close it, then reopen tech2win, it will be normal.

Select ECM.

Select view all DTCs.

Clear fault codes.

vxdiag-gds2-and-tis2web-install-31 vxdiag-gds2-and-tis2web-install-32


10.Run GDS2, select language.

Allow access.

Enter diagnostics.

Select MDI2, then “Continue” to select “Connect”.

The software automatically recognizes the vehicle VIN, click on “Enter” to diagnosis.

vxdiag-gds2-and-tis2web-install-33 vxdiag-gds2-and-tis2web-install-34 vxdiag-gds2-and-tis2web-install-35 vxdiag-gds2-and-tis2web-install-36


Read warning.

Select year (2020 – 2009) ->Buick -> Envison -> Module diagnostics -> [K20] Engine control module.

2.5L (LCV)

Automatic Transmission 9 speed (M3T)

DTC display.

vxdiag-gds2-and-tis2web-install-37 vxdiag-gds2-and-tis2web-install-38 vxdiag-gds2-and-tis2web-install-39 vxdiag-gds2-and-tis2web-install-40


Done.


Vxdiag VCX Nano tech support: www.uobdii.com

How to enable VVDI Key Tool Max COPY 48 96bit?

$
0
0

To enable VVDI Key Tool Max COPY 48 activation , 10 new remotest must be generate
No matter if they are Wire remote, NXP remote, Smart key, or Super chip.


The method to obtain free ID48 96bit function:

Please use VVDI Key Tool Max to generate 10 pieces of Xhorse new remote key, after collecting the points, the server will open ID48 96bit function free 1 hour later.

1-5 2-2 3-1


Important tips:

1.VVDI key tool Max ID48 96bit Copy cannot be purchased, only after generating 10 xhorse remote key and collecting points, the user can get it for free.

2.Unlike VVDI MINI key tool, VVDI key tool Max ID48 96bit Copy is not free with one-year tokens.

How and where to get the tokens:

1st method. Purchase tokens

http://www.uobdii.com/wholesale/1-token-for-vvdi2-vvdi-key-tool-96-bit-id48-copy.html

2nd method. Collect points from Xhorse remote key:

wire remote/ 25bonus points

wireless remote/ 40 bonus points

smart key /60 bonus

1 Token=100 points.


VVDI Key Tool Max tech support: www.uobdii.com

How to online update Tango 1.115.0 original on PC?

$
0
0

Original Scorpio-LK Tango Key Programmer V1.115 is released, this poster will show you how to update Tango 1.115.0 on PC successfully.

update-Tango-1


1.Download the software files on your desktop (here: http://www.scorpio-lk.com/)

2.Double click on the Tango software installation file (.exe).

3.Select language and click Ok.

4.Click Next.

5.It’s recommended to leave the installation path as it is and click Next.

6.You can change the name of the shortcut in your start menu. Click Next.

7.Check the checkbox Create a desktop icon for easier access and click Next.

8.Wait for the installation.

9.Deselect “Launch Tango” and click “Finish”.

10.Go to the folder, where you just installed your Tango Software.(Default : My Computer > Local Disc(C:) > Program Files (x86) > Tango Scorpio-LK).

11.Open the “Driver” folder.

12.Choose your operation system type and open the folder.

13.Right click on the “ftdibus” and choose” Install”.

14.Click “Ok” to finish the driver installation.

15.Go to your desktop and right click on the Tango software’s shortcut.

16.Choose “Run as administrator”.

17.When the Software starts click “Update” on the “On-Line Update” window to update your Tango Software.

18.Click “Ok” and wait for the update to complete.

19.Your Tango programmer is now ready for work! For video Tutorial on “How to install Tango Software” check on the section above.


Question: Tango error L0030 user is not admin.

update-Tango-02


uobdii.com engineer replied:

Please choose “Run as administrator”.


Finally, the problem is solved. Tango 1.115.0 update successfully.

2M2 Cut HON66 “Left side is not equal to right side”, does it matter?

$
0
0

One 2M2 Magic Tank user feedback he has HON66 [No.25] to cut, but he has the confusion that : aafter calibrating the left side ,the right side is not equal (Left side=2.9mm, Right side =3.0mm).

2m2-magic-cut-hon66-01 2m2-magic-cut-hon66-02 2m2-magic-cut-hon66-03


2M2 chief engineer replied:

Please ignore the number of calibration, the position of cutter and tracer depend upon the number after calibration, so the number has a little tolerance that is normal. The most important is to put the blade 25# into the right position. that is okay.

2m2-magic-cut-hon66-04

Video on HON66 Key Cutting by 2M2 Tank Magic Key Machine:

2M2 Tank Machine tech support: www.uobdii.com

How to use 2M2 Magic Tank “Search Code” when all keys lost?

$
0
0

Some users are wondering whether 2M2 Magic Tank contains built-in database like insta–code?


The answer is 2M2 has no instacode database, but have “Search Code” option which share as the same function as instacode.

2m2-search-code


Using tips:

  1. Search Code is uppercase letter
  2. Lock number must be correct.
  3. Connect the network.


There are 3 videos on how to use “Search Code” when all keys lost:


Hyundai HY22 all key lost done via 2M2

https://youtu.be/i5zOKbnIjTo


KIA TOY40 all key lost done via 2M2

https://youtu.be/-y9pTrkHxHY


Lexus TOY48 all key lost done via 2M2


2M2 Magic Tank tech support www.uobdii.com


Fixed! V2019.12 Xentry adaptation error on ML350 ISN & GLE 43 SRS

$
0
0

Question: used V2019.12 Xentry to perform adaptation on 2013 Mercedes ML350 ISM and 2017 Mercedes GLE 43 airbag, unfortunately, I got error “A fault has occurred”, then I tried to use V2019.09 Xentry, it works fine with no issue, I asked some friends from other repair shop, they came across the same question, how to solve this?

xentry-2019-12-adaptation-error-01


Xentry engineer replied:

So far, crack V2019.12 Xentry and newest V2020.3 Xentry can’t perform online programming yet, even though you have the online account. Please use V2019.09 Xentry to run with sd connect c4.


Good luck!

www.uobdii.com


How to fix ktag MPC555 “Communication error with the ECU”?

$
0
0

Look at the following images, I used ktag master Ksuite software to read & write MPC555, I got ” Communication error with the ECU: control all connections, if the problem persists, send the LOG file to the assistance”.

Its 2 day I try all instruction by ktag but no way to read this ecu
I use adapter 12
12v + = pin 4 ECU
CND = pin1  ECU

ktag-MPC555-error-01 ktag-MPC555-error-02 ktag-MPC555-error-03


And type of ECU:

ktag-MPC555-error-solution-04


Solution:

You need Grnd , Battery +12volt and Ignition +12volt for ecu to wakeup and be able to read-write.
MPC5xx needs DSCK( timing clock) , DSDI(data in ) ,DSDO (Data out) , RESET for BDM communications.

Bosch BDM pads arrangement are different from Motorola BDM.Also wire 2 and wire 9 from KTAG bdm cable do supply +12volt to ecu you are working on ,,, and if you used wrong adapter then DSDI circuitry most likely fried in MPC5xx ,,, after that you will not be able to connect to mcu through BDM (background debug mode).


Good luck!


Thanks to @ familyman.


http://www.uobdii.com/wholesale/firmware-ktag-v7.020-ecu-programming-tool.html

Confirmed: Ktag7.020 Read Write Bosch EDC17C74 Possible

$
0
0

Question: I try to read Bosch EDC17C74 with Red PCB ktag7.020 Ksuite 2.25 and higher voltage but no success.


Confirmed: I can read write Bosch EDC17C74 with Red PCB ktag7.020 Ksuite 2.25 by a voltage of 12.6 v.

Read-write-bosch-edc17c74-with-ktag-7-020-01 Read-write-bosch-edc17c74-with-ktag-7-020-02 Read-write-bosch-edc17c74-with-ktag-7-020-03 Read-write-bosch-edc17c74-with-ktag-7-020-04


More reviews from DK forum and mhh forum:

1.Read mpc with ktag 7.020 china clone and write mpc over obd with kess.
All ok.
Edc17c74 works with ktag 7 china clone..

Car is from 2018


2.KTAG clone 7.020 exellent works with EDC17C74.

3.0tdi on edc17c74 working 100%


Any more question on Red PCB ktag7.020, you can contact at: www.uobdii.com

Nissan Consult 3 plus Infiniti Q50 Feedback

$
0
0

Nissan consult 3 plus diagnostic tool is confirmed to cover Infiniti Q50 (i.e New Infiniti Q50 Y37 07/2017 – Onwards), seeing is believing, please look at the following two images.

nissan-consult-3-plus-infiniti-q50-01 nissan-consult-3-plus-infiniti-q50-02


Nissan consult 3 plus users’ feedback has more reference value:

1.Have Infiniti Q50 2.2d 2016 diesel, tested Consult 3 Plus V75 can read & reset ECU, and erase Adblue trouble code like P13E5 and P13E4.


2.It looks like that for Nissan and Infiniti, if you want to make good diagnostics, you need the whole consult III hardware and software. There is the consult III or Consult III Plus available. The first one is about 250$ US and the PLus is about 700$. It looks like the only difference between the two is the VI and the programming. I have the non-plus version and I can make many nice system validations. I just realigned the radar cruise with it (something that usually only the dealer can do.). I also have the engine link app on my ipad using a odbII wifi connector but it does not do a fraction of what can the consult III can do. Hope this helps!


3.For Infiniti Q50, Nissan consult 3 plus can change certain features (theoretically, yes), such as allowing closing of all windows using key fob, allowing fogs to stay on in auto hi-beam when low beams are on, being able to set how far the mirrors tilt in reverse, etc.

All of the systems in this car run through the hi and low CAN which goes through the BCM and ECU. CONSULT can modify these settings, as far as I understand.

Credits to @ Boxy (infinitiq50.org)


4.How to bypass nats (security card) on nissan consult 3 plus, please visit this mega:

https://mega.nz/#!OdFmURCA!tyv-3tXTt-3csrTvvaiK6CisnC1qLVSfbKjyejT0woI


6.I especially try to diagnose effectively, clear the defects, possibly handle this damn Fap .And then I used Nissan consult 3 plus, it can reset after “organ” change like egr valves on Nissa006E.


Nissan consult 3 plus source:

http://www.uobdii.com/wholesale/nissan-consult-3-plus-diagnostic-system.html

How to renew Benz ECU with VVDI MB & CGDI MB?

$
0
0

Confirmed: both VVDI MB & CGDI MB can renew Mercedes Benz ECU. This article is available with the step-by-step procedure.


Part 1: How to use CGDI MB to renew Mercedes Benz ECU SIM271KE2.0.

Need:

1.CGDI MB Prog ($559)

2.ECU cable ($59.99)

cgdi-mb-plus-ecu-cable-01


Method: on the bench via OBD


1.Open the CGMB software, click on “Auto computer”.

cgdi-mb-renew-benz-ecu-02


2.Press “Read” and wait for the info, the data will show.

Press “Get erased password”, usually it will take a few seconds, it depends on the internet connection speed, if it failed, just do it again and you will get the password successfully.

cgdi-mb-renew-benz-ecu-03


3.Press “Erase” to clear the ECU,  you will get message “successfully”.


4.Again, press “Read”, and your ECU is ready to be programmed on the car. As you can see, it’s not activated it’s not personalized any more.


Done.


That’s the whole job, few seconds on me.


Part 2: How to use VVDI MB Tool to renew Mercedes SIM271KE2.0 & SIM271DE2.0 on Bench

For Mercedes SIM271KE2.0, need:

VVDI MB ($1,100) + Mercedes Benz SIMKE2.0 ECU renew cable ($70)

2


For Mercedes SIM271DE2.0, need:

VVDI MB ($1,100) + Mercedes Benz SIMDE2.0 ECU renew cable ($70)

1


Procedure:

http://blog.uobdii.com/vvdi-mb-renew-benz-sim271de2-0-sim271ke2-0/


To sum up:

To renew Benz ECU, CGDI MB wins in cheaper price.


www.uobdii.com

Comparison:Xhorse smart remote, super remote, wired remote, wireless remote

$
0
0

Look at the comparison table among Xhorse wired remote, wireless remote, super remote, smart remote (comprehensive made by Xhorse chief engineer).


All here: http://www.uobdii.com/producttags/xhorse-smart-keys-and-chips.html

Type
Function
Wired Remote Wireless Remote Super Remote Smart Remote
PCB Picture 1-1 2-1 3 4
Factory No. XK Series XN Series XE Series XS Series
Package Color In Red color In Blue color In Purple color In Orange and Red color
Package outlook xhorse-wired-remote-01 xhorse-wireless-remote-02 xhorse-super-remote-03 xhorse-wired-remote-01
Bonus Points(for 1st time) 25 Points 40 Points 40 Points 60 Points
Reusable Reusable Reusable Reusable Reusable
Remote Control Function
Remote Generation Method Connect via the Socket Wireless Generation  (Need to install battery first) Wireless Generation  (Need to install battery first) Wireless Generation  (Need to install battery first)
immo Chip No, need to add a immo chip (like 46 chip) into the wired key before starting the car Yes, depends on the NXP immo chip Yes, depends on the super chip. Yes,depends on the smart chip.
Transponder No Copy 46 + generate chip Copy chip + generation chip keyless go
Remote Generation Device vvdi key tool, vvdi mini key tool, vvdi2,vvdi key max etc vvdi key tool, vvdi mini key tool,

vvdi2,vvdi key max etc

vvdi key tool, vvdi mini key tool, vvdi2,vvdi key max etc vvdi key tool, vvdi mini key tool, vvdi2,vvdi key max etc
Remote Matching Manual/remote matching equipment Manual/remote matching equipment Manual/remote matching equipment Remote matching equipment;
Only vvdi2 can match key for MQB.
Application Range For the users who only match the remote. Suitable chip copy & generation list
(The remote control also needs to be matched and it can replace the wired remote)
Suitable super chip copy & generation list
(Can generate the special chips, it needs to bematched to the car, and the remote controlalso needs to be matched. Can replace wired / wireless remote)
Suitable the car with smart remote
Note: In addition to the MINI OBD working together with KEY TOOL MAX, the other remote control matching equipments (such as IKEY820, K518, OBDSTAR, XTOOL, SBB, CK-100) can work too.
MQB Smart Remote is suitable for all brands (universal type with MQB outlook)
VW MQB smart remote:need to use the universal smart remote to generate MQB smart remote and then to match)


1.Wireless remote generation and copy:

Support 46 copy

47: firstly generate then copy with one Xhorse device(vvdi mini key tool,vvdi key max,vvdi2).

wireless-remote-01


2.Super chip generation and copy:

super-remote-generation-copy-02 super-remote-generation-copy-03


Enjoy!


www.uobdii.com

Viewing all 3197 articles
Browse latest View live